Retrieval Augmented Generation (RAG) is a powerful approach for building generative AI applications by providing foundation models (FMs) access to additional, relevant data. This approach improves response accuracy and transparency while avoiding the potential cost and complexity of FM training or fine-tuning.
Many customers use Amazon Bedrock Knowledge Bases to help implement RAG workflows. You can deploy an Amazon Bedrock knowledge base for initial development and set up connections with data sources with a few clicks in the AWS Management console. When it comes to migrating your development setup to an infrastructure as code (IaC) template for production deployment, it’s helpful to start from an existing IaC project template because there are there are additional configuration details to specify that are abstracted away in the console. While CDK-based templates are already available for setting up Bedrock knowledge bases, many organizations use Terraform as their preferred infrastructure-as-code framework.
In this post, we provide a Terraform IaC solution for deploying an Amazon Bedrock knowledge base and setting up a data source connection to help you quickly get started with deploying RAG workflows with Terraform. You can find the solution in our AWS Samples GitHub repository.
Solution overview
The solution automates the creation and configuration of the following AWS service components using Terraform:
- AWS Identity and Access Management (IAM) role: Establishes secure access and execution policies across services.
- Amazon OpenSearch Serverless: Configures an index collection to manage and query large datasets efficiently.
- Amazon Bedrock Knowledge Bases: Provides FMs and agents contextual information from your data sources to deliver relevant, accurate, customized responses.
The following diagram illustrates the solution architecture for how these services are integrated:
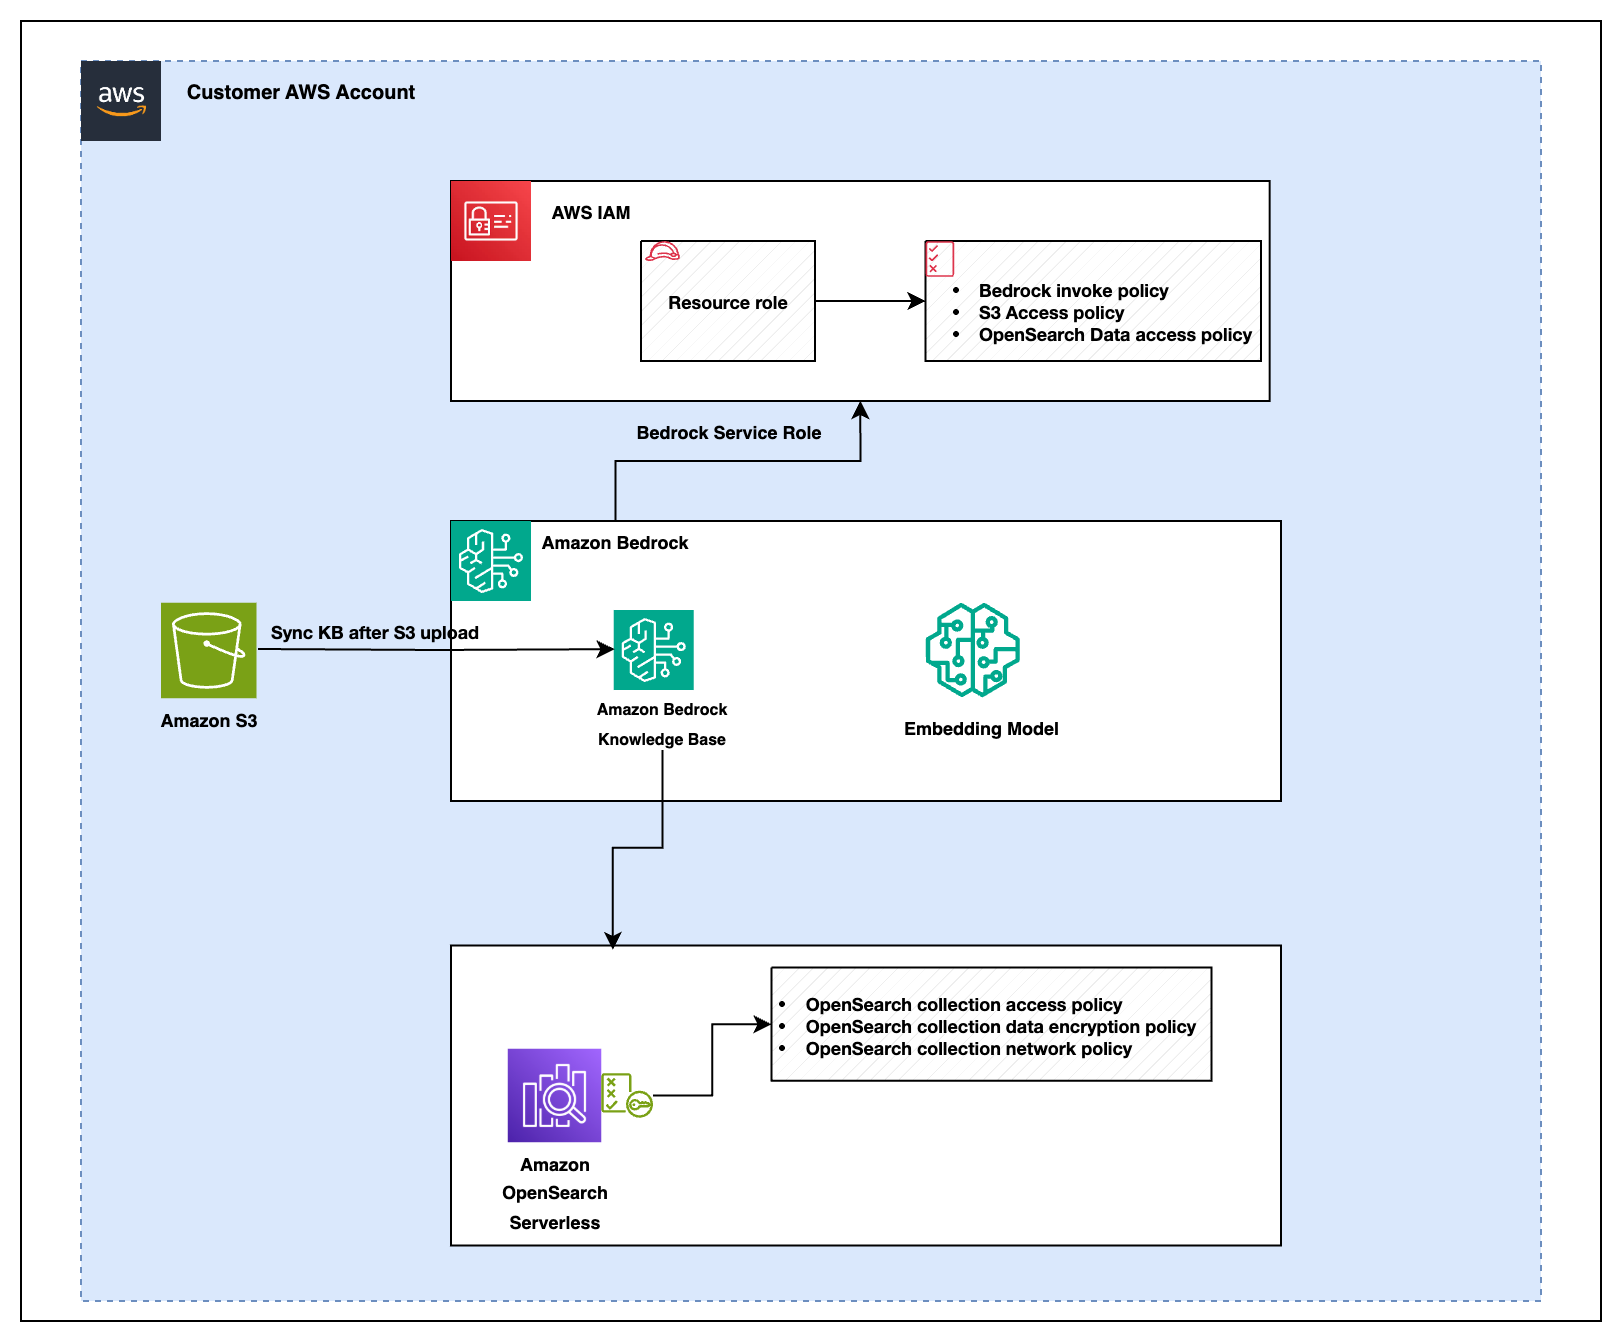
The figure shows that there are several IAM policies that govern permissions for the services involved in the solution:
- Amazon Bedrock policies
- Amazon Bedrock invocation policy: Authorizes the system to invoke Amazon Bedrock services for knowledge base operations and data retrieval.
- Amazon S3 access policy: Grants necessary read and write permissions to the system components ( like Amazon Bedrock, AWS OpenSearch, or other services) that require access to Amazon Simple Storage Service (Amazon S3) for secure data storage and retrieval.
- OpenSearch data access policy: Defines access permissions to interact with AWS OpenSearch collections within the Amazon Bedrock environment. This policy controls who can query, update, or manage OpenSearch data, making sure only authorized users or services have access to the data.
- OpenSearch policies
- OpenSearch collection access policy: Defines access permissions for querying data in OpenSearch collections.
- OpenSearch collection data encryption policy: Makes sure data stored within OpenSearch collections is encrypted for security.
- OpenSearch collection network policy: Controls network-level access to OpenSearch collections to secure data transfer within the system.
Deploying these resources through IaC enables programmable infrastructure management, reducing manual setup effort. The deployment process makes sure that you can start querying your data almost immediately after setup, with minimal configuration required. This automated approach streamlines maintenance of your RAG-based application.
Prerequisites
To successfully deploy this solution, make sure you have the following prerequisites in place:
- AWS account: An active AWS account is required. If you don’t have one, you can create an account using the AWS Management Console.
- IAM role and permissions: Make sure that you have an AWS Identity and Access Management (IAM) role and a user with the necessary permissions to create and manage AWS resources. This setup should include permissions to handle AWS services such as Amazon S3, Amazon OpenSearch Service, and Amazon Bedrock.
- Terraform: Make sure that Terraform is installed on your local machine. Follow the installation guide provided in the AWS Modernization Workshop with Hashicorp Terraform Cloud for detailed instructions.
- AWS CLI: Configure the AWS Command Line Interface (AWS CLI) with appropriate credentials to interact with your AWS resources. For setup instructions, see Configuring settings for the AWS CLI.
- Document storage: Set up an Amazon S3 bucket and upload your documents in supported formats such as TXT, MD HTML, DOC, DOCX, CSL, XLS, XLSX, or PDF. Make sure your S3 bucket is correctly configured to work with other AWS services involved in the deployment.
If you need a sample document for testing, we suggest using the AWS Well-Architected Framework guide which you can download as a PDF.
Amazon Bedrock model access
Make sure you have enabled access to a foundation model (FM) in Amazon Bedrock for generating embeddings. The solution uses the Titan Text Embeddings V2 model by default. You can complete the following steps to enable model access in Amazon Bedrock:
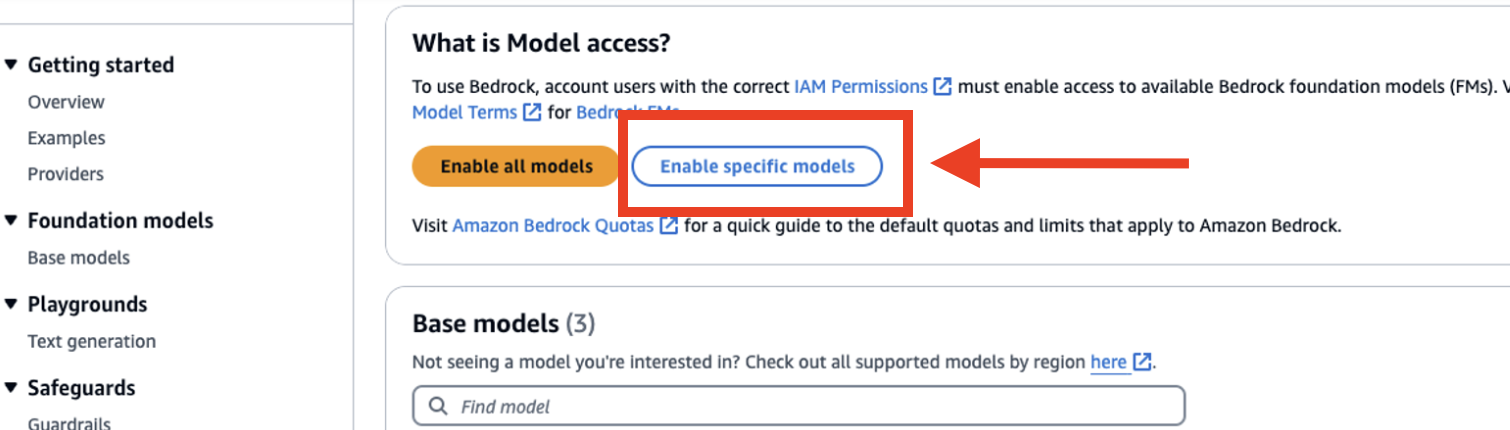
- Navigate to the Amazon Bedrock console.
- Choose Model access from the navigation pane under Bedrock Configurations.
- Select Enable specific models.
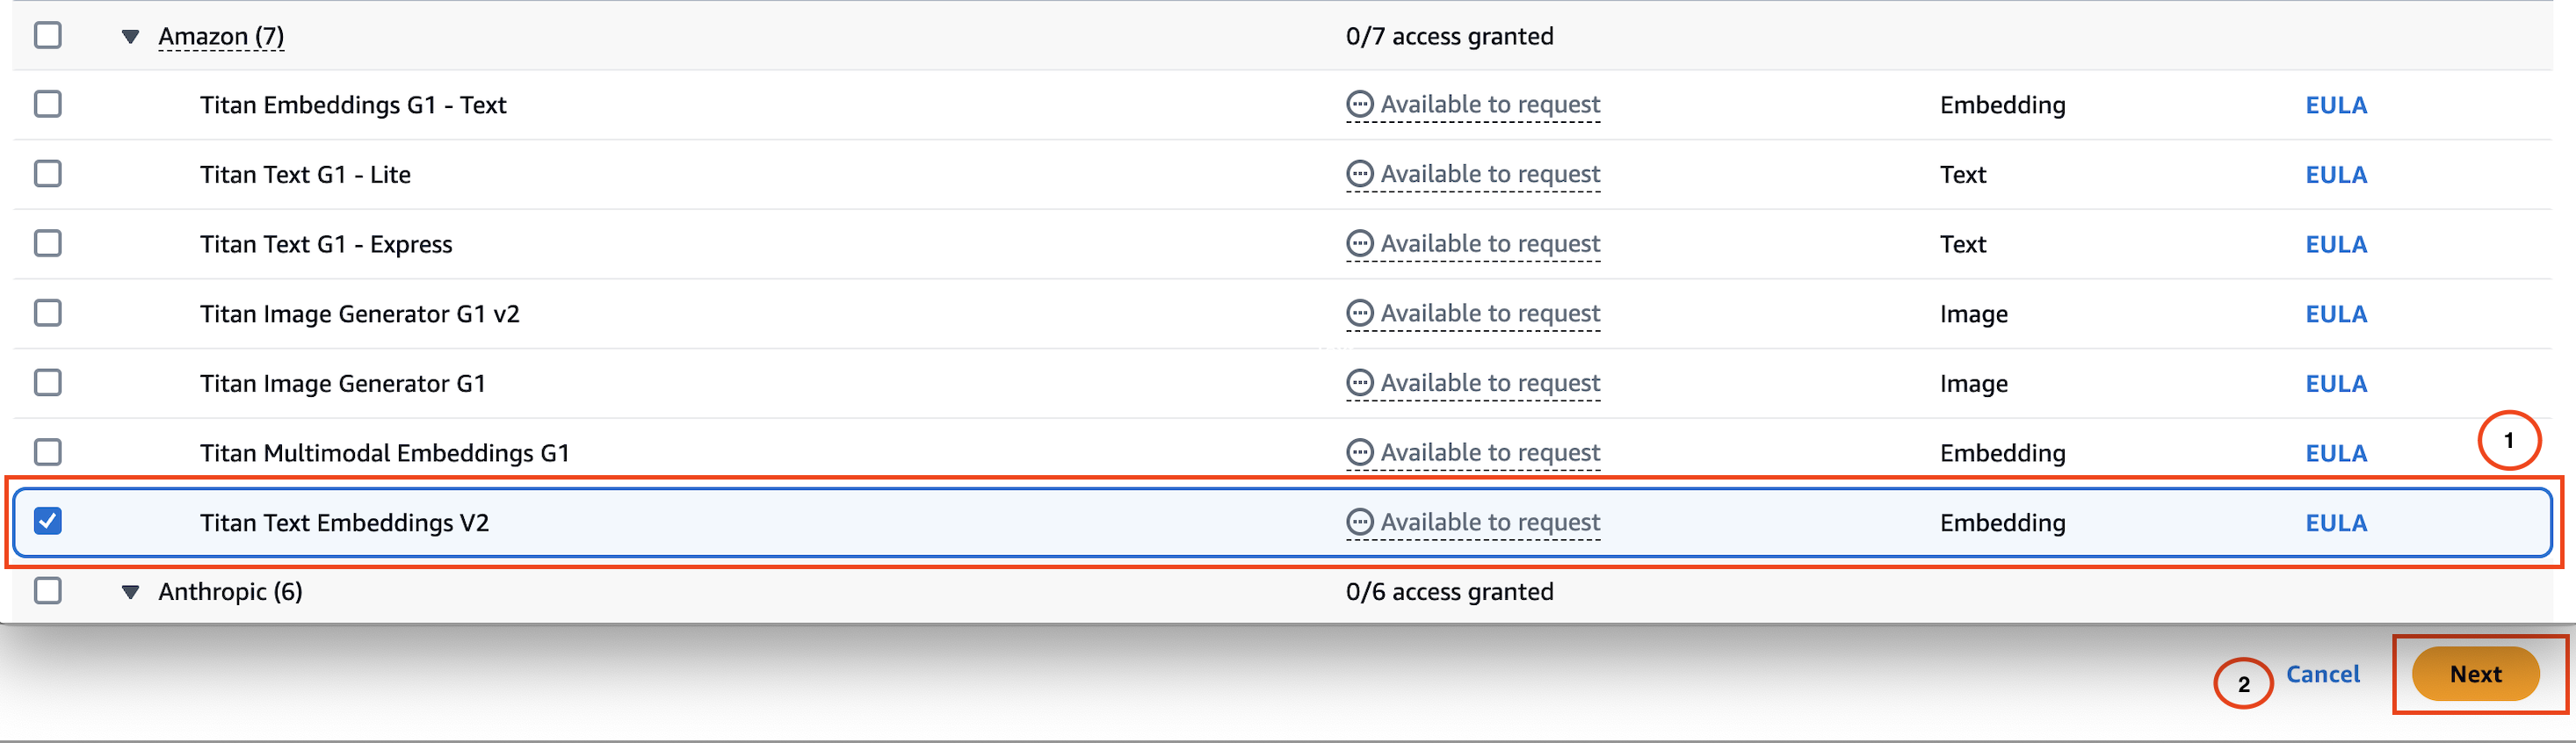
- Select the Titan Text Embeddings V2 model.
- Choose Next and complete the access request form to enable the model.
Set up the project
- Clone the repository:
- Decide where you want to clone the repository. This could be:
-
- Your local machine: If you’re working directly on your laptop or desktop.
- An EC2 instance: If you’re deploying the setup from a remote server.
- AWS CloudShell: If you prefer using the AWS browser-based command line interface.
-
- Configure your AWS credentials for Terraform using one of the supported methods.
- Navigate to the appropriate directory on your chosen environment and run the following command to clone the repository:
Make sure that the environment has Git installed and that your SSH key is configured to access the repository.
- Decide where you want to clone the repository. This could be:
- Move into the cloned directory:
- Update the AWS Region:
- Purpose: Set the AWS Region in the Terraform configuration to make sure the correct region is used.
- Default: No default. This must be provided by the user.
- Location to update:
- File: main.tf
- Line: Look for the
"aws"provider block.
- Provide S3 bucket name:
- Purpose: Specifies the S3 bucket where knowledge base data will be stored.
- Default: No default. This must be provided by the user.
- Location to update:
- File:
main.tf - Line: Look for the
"kb_s3_bucket_name_prefix"variable in the"knowledge_base"module block.
- File:
- Set additional configuration settings for the knowledge base module (optional):
Theknowledge_basemodule accepts additional optional inputs to customize settings such as the chunking strategy, embedding model used, and the name of the created knowledge base resource.See the
modules/variables.tffile for additional module input variables that can be used to control fine-grained settings like embedding size and other chunking behavior. - Validate and deploy the stack:
Run the following command to prepare your working directory (Terraform folder):The following image shows the output of the
terraform initcommand: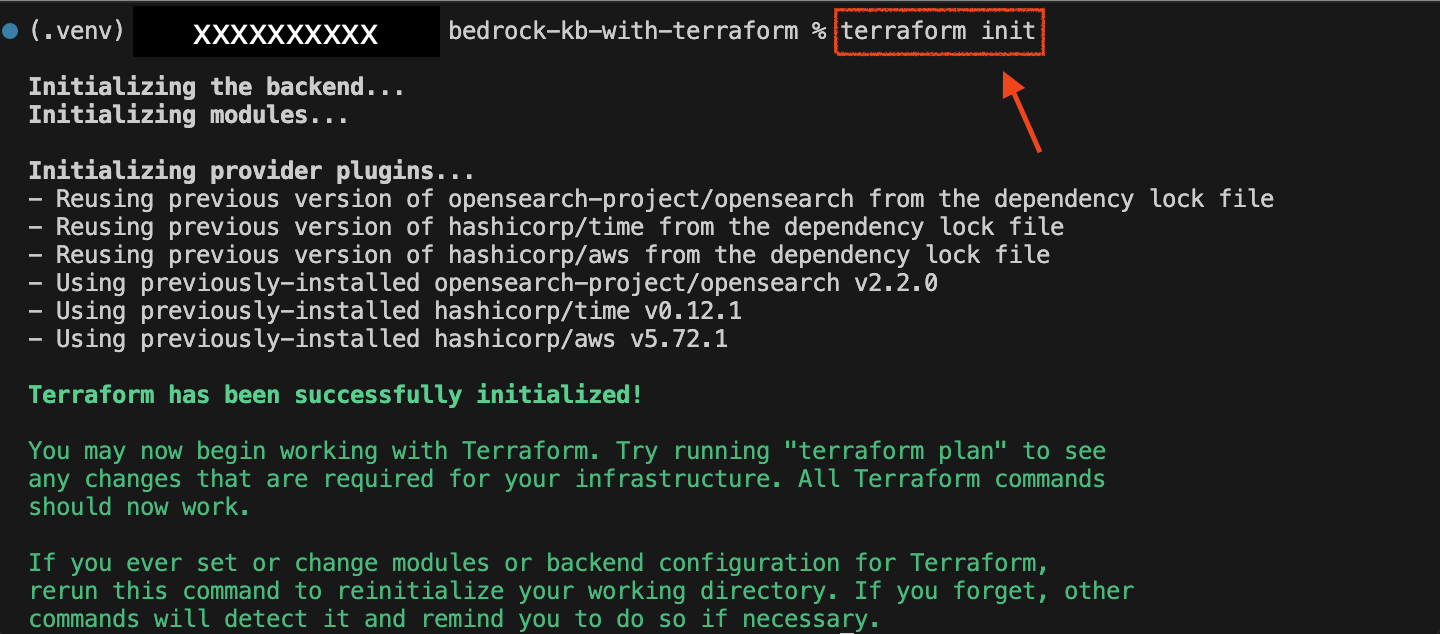
Before applying changes, it’s crucial to understand what Terraform will modify in your environment.
Use the following command to generate and review the execution plan:The
-outoption is used to save the generated plan to a file, which can then be applied exactly withterraform apply.
Without the-outoption, Terraform will generate a new plan when you runterraform apply.
This new plan might differ from the original one because of changes in the environment or resources between the time you created the plan and when you apply it.
This command displays the proposed changes, outlining what resources will be created, modified, or destroyed. The output includes detailed information about each resource:
- + Create: Resources that will be newly created.
- ~ Update in-place: Resources that will exist with modified attributes.
- – Destroy: Resources that will be removed.
By reviewing this plan, you can verify that the changes align with your expectations before moving forward with the deployment.
This step makes sure that only the intended modifications are applied, helping to prevent potential disruptions in your environment.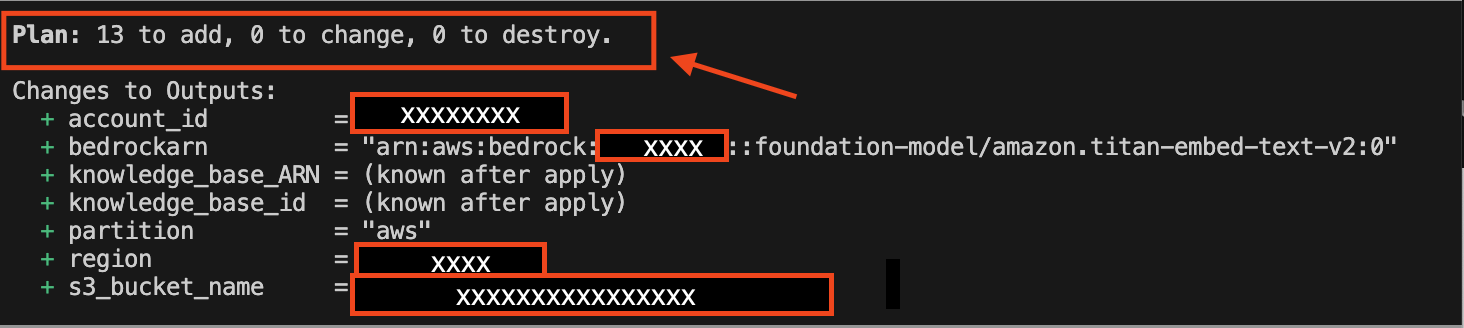
- Deploy the infrastructure:
Apply the changes and deploy the resources to your AWS account:terraform apply
When you runterraform apply, Terraform automatically creates a plan and prompts you to approve it before executing the configuration changes.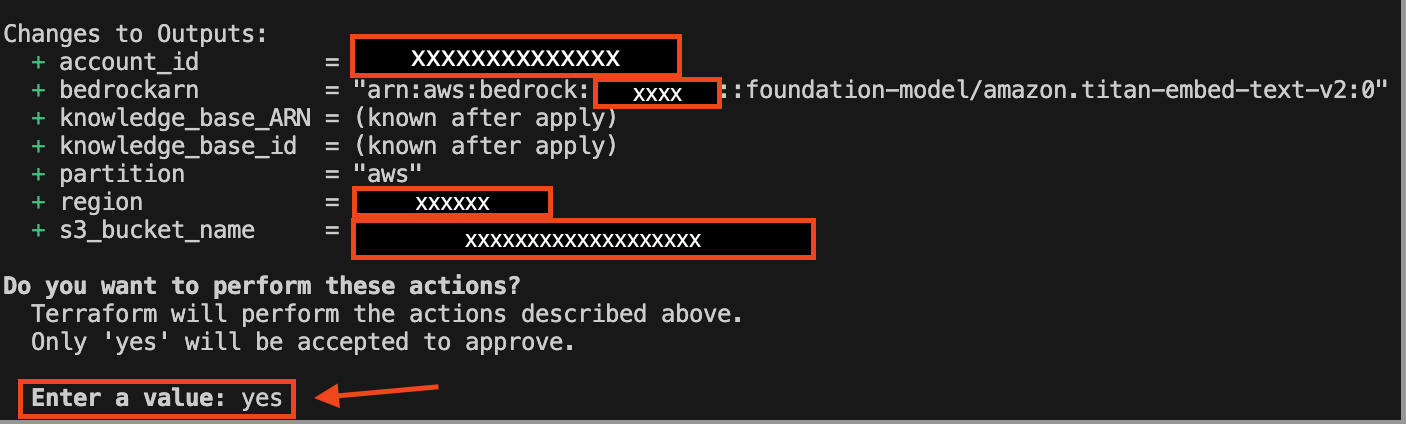 The following image shows what the output prompt and changes to output variables will look like:
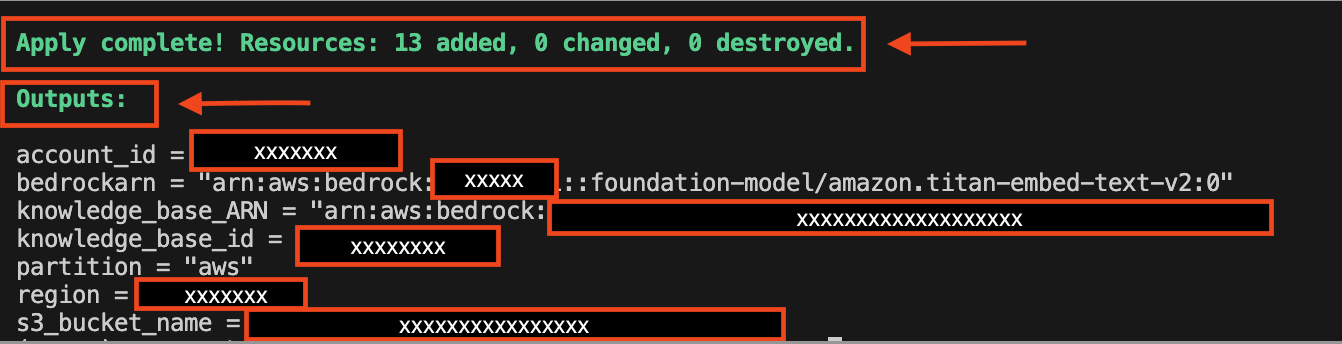
Advanced customization options for your knowledge base deployment:
The Terraform module offers flexibility for users to customize various parameters based on their specific use cases. These configurations can be quickly adjusted in the variables.tf file. In this section, we explain how you can tailor the chunking strategy and OpenSearch vector dimensions to meet your requirements.
Customize the chunking strategy and token limits
The chunking strategy determines how the knowledge base splits content into smaller, manageable chunks for efficient processing. This module supports the following strategies:
- DEFAULT: Standard chunking with no additional customization.
- FIXED_SIZE: Divides content into chunks of a fixed token size with optional overlaps.
- HIERARCHICAL: Creates hierarchical chunks with parent-child structures.
- SEMANTIC: Splits content based on semantic meaning for improved contextual grouping.
Modify fixed-size chunking (optional)
If you choose FIXED_SIZE as the chunking strategy, you can further customize:
- Maximum tokens per chunk: Adjust the
fixed_size_max_tokensvariable. - Overlap between chunks: Configure the
fixed_size_overlap_percentagevariable.
Modify hierarchical chunking (optional)
For HIERARCHICAL chunking, you can adjust:
- Parent and child token limits: Use
hierarchical_parent_max_tokensandhierarchical_child_max_tokens. - Overlap tokens: Configure the
hierarchical_overlap_tokensvariable.
Modify semantic chunking (optional)
For SEMANTIC chunking, you can customize:
- Maximum tokens: Use the
semantic_max_tokensvariable. - Buffer size: Adjust
semantic_buffer_size. - Breakpoint percentile threshold: Modify
semantic_breakpoint_percentile_threshold.
Customize the OpenSearch collection vector dimensions
The vector dimension defines the size of embeddings generated by the selected model and impacts the precision of searches within the OpenSearch collection. You can adjust the vector_dimension variable in the variables.tf file:
Depending on your use case and vector dimension values supported by your embedding model, you could consider increasing the vector dimension setting for increased retrieval precision. To optimize for storage and query performance, you could consider decreasing the vector dimension setting.
Test the knowledge base in Amazon Bedrock:
Follow these steps to test the knowledge base’s interaction with the chosen FM model to verify that it performs as expected.
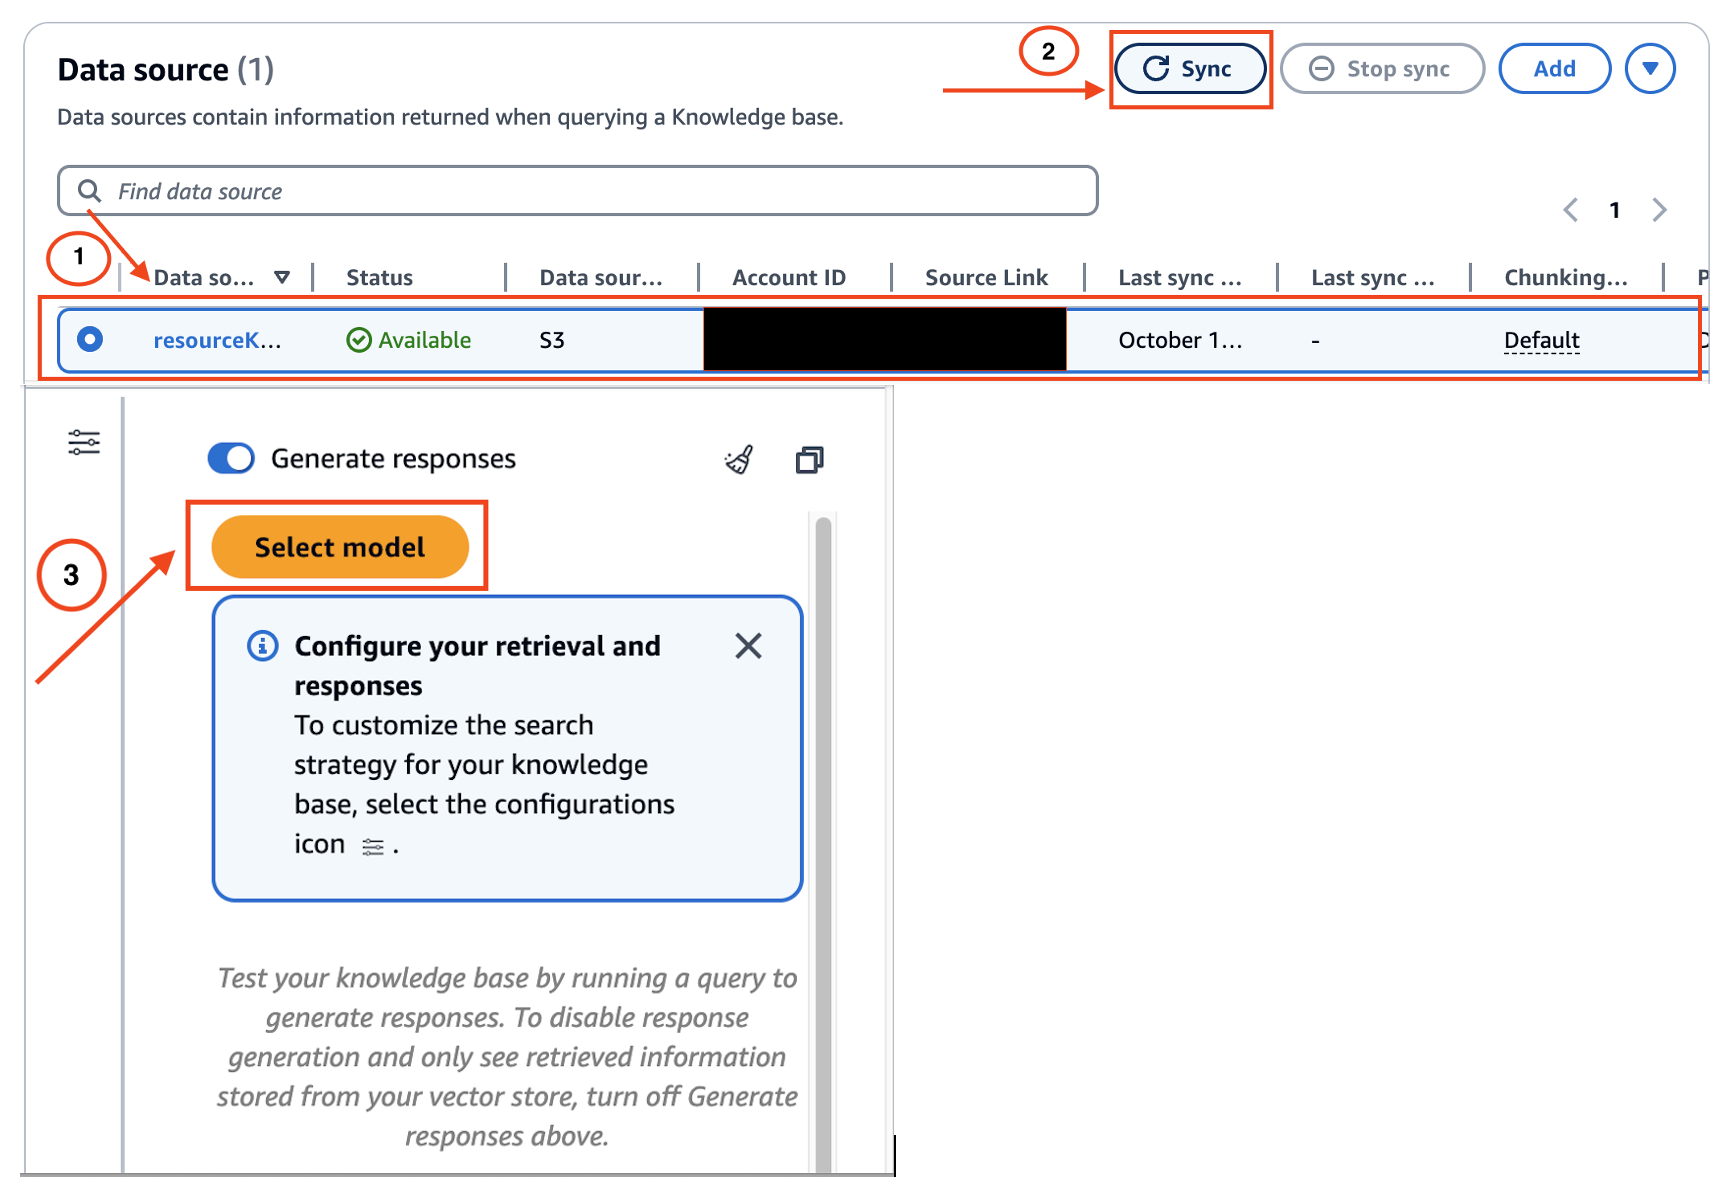
- Navigate to the Amazon Bedrock console and choose Knowledge Bases from the navigation pane.
- Select the knowledge base you created.
- Choose Sync to update the data stored in the S3 bucket.
- Choose Select Model .
- From the model selection window, select your desired FM.
- Test the knowledge base by submitting your Q/A queries to see how the model responds.
Clean up
To avoid incurring additional costs, clean up your environment after testing or deploying with Terraform:
Remove infrastructure resources
- Open your terminal and navigate to the directory containing your Terraform files.
- Execute the following command to remove the resources defined in your Terraform configuration:
terraform destroy
- The command will prompt you to confirm the destruction of the resources. Enter
yesto proceed.
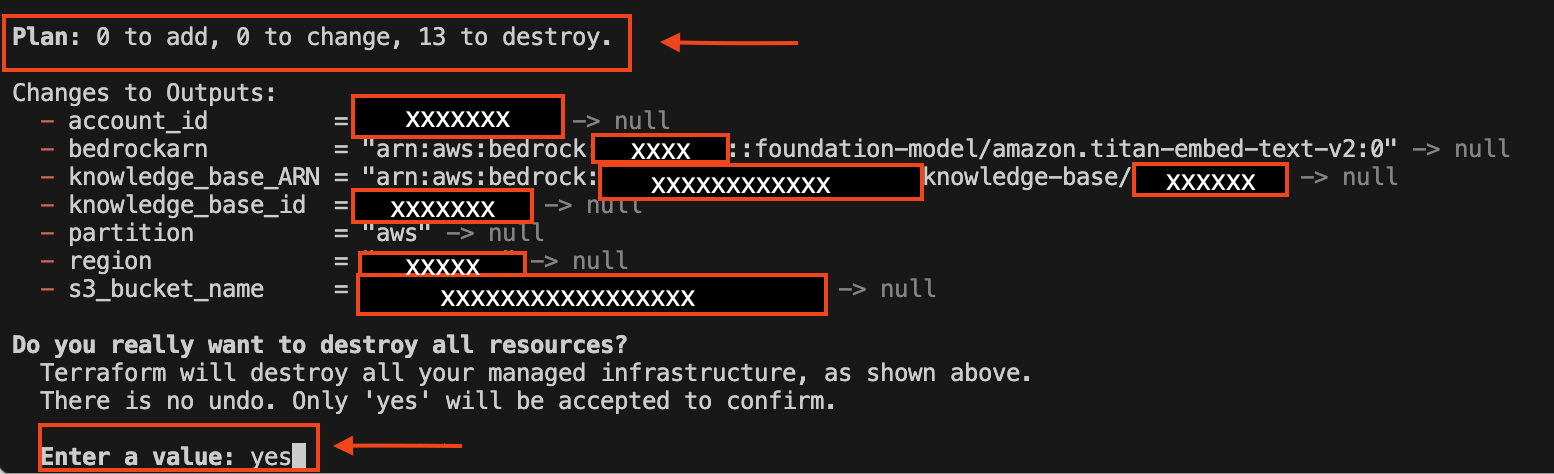
- The following is a screenshot of the expected output confirming that the resources have been removed.

Delete S3 bucket contents:
- Make sure you delete all files within the S3 bucket to avoid future charges.
Manual cleanup of state files (optional):
- If you want to completely clean your project directory, remove the Terraform state files by executing the following:
This procedure facilitates a thorough cleanup of your environment and avoids potential costs associated with unused resources.
Conclusion
In this post, we demonstrated how to automate the deployment of Amazon Knowledge Bases for RAG applications using Terraform.
If you want to deepen understanding of AWS services and Terraform, see the following resources:
- Learn more about Amazon Bedrock Knowledge Bases
- Learn more about managing infrastructure with AWS Modernization Workshop with HashiCorp Terraform Cloud
Do you have questions or insights about deploying RAG systems with Amazon Bedrock? Feel free to leave a comment below or share your experiences and challenges.
About the authors
 Andrew Ang is a Senior ML Engineer with the AWS Generative AI Innovation Center, where he helps customers ideate and implement generative AI proof of concept projects. Outside of work, he enjoys playing squash and watching travel and food vlogs.
 Akhil Nooney is a Deep Learning Architect with the AWS Generative AI Innovation Center, where he collaborates with customers to understand their generative AI use case requirements and design scalable, production-ready solutions. He helps organizations tackle complex challenges using generative AI, driving efficiency and innovation. Akhil holds a Master’s degree in Data Science from the University of North Texas. His previous research focused on synthetic data generation for healthcare applications using GANs and VAEs.