Organizations can optimize their migration and modernization projects by streamlining the containerization process for legacy applications. With the right tools and approaches, teams can transform traditional applications into containerized solutions efficiently, reducing the time spent on manual coding, testing, and debugging while enhancing developer productivity and accelerating time-to-market. During containerization initiatives, organizations can address compatibility, dependencies, and configurations efficiently using automated tools and best practices, helping to keep projects on schedule and within budget parameters. Development teams can focus more on innovation by automating routine tasks such as application architecture analysis, deployment script creation, and environment configuration, leading to smoother transitions across different stages of the modernization journey.
In this post, you’ll learn how you can use Amazon Q Developer command line interface (CLI) with Model Context Protocol (MCP) servers integration to modernize a legacy Java Spring Boot application running on premises and then migrate it to Amazon Web Services (AWS) by deploying it on Amazon Elastic Kubernetes Service (Amazon EKS). The Amazon Q Developer CLI helps automate common tasks in the modernization process. You’ll introduce chaos into the system after successful modernization. Then you’ll troubleshoot it using Amazon Q Developer CLI. You’ll perform all these activities using natural language prompts without writing code.
Amazon Q Developer goes beyond coding to help developers and IT professionals with many of their tasks—from coding, testing, and deploying to troubleshooting, performing security scanning and fixes, modernizing applications, optimizing AWS resources, and creating data engineering pipelines. Amazon Q for the command line integrates contextual information, providing Amazon Q with an enhanced understanding of your use case, enabling it to provide relevant and context-aware responses. The MCP is an open standard that enables AI assistants to interact with external tools and services. It defines a structured way for AI models to discover available tools, request tool execution with specific parameters, and receive and process tool results. You’ll use MCP to extend the capabilities of Amazon Q Developer CLI by connecting it to custom tools and services.
Although we’re showcasing the capability of Amazon Q Developer CLI in this end -to-end migration and modernization journey, if you’re using one of the supported integrated development environments (IDEs) and Java versions, you can use the /transform command to perform the step 2. For more information, visit Upgrading Java versions from Amazon Q Developer.
Solution overview
MCP servers act like a universal connector for AI models, enabling them to interact with external systems, fetch live data, and integrate with various tools seamlessly. This allows Amazon Q to provide more contextually relevant assistance by accessing the information it needs in real-time. The following architecture diagram shows how Amazon Q Developer CLI connects to external data sources through MCP servers.
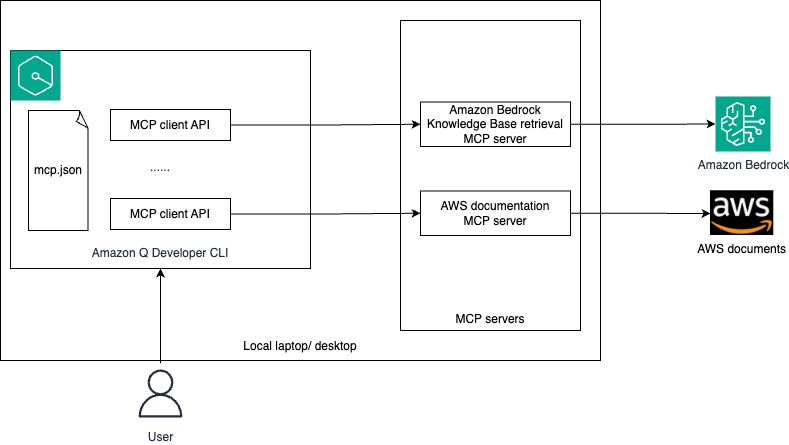
The following is a summary of the functionality of the architecture:
- You’ll configure MCP client in Amazon Q Developer CLI using mcp.json file.
- You’ll log in to Amazon Q Developer CLI and ask queries in natural language.
- Depending on your query, Amazon Q Developer decides which MCP server(s) that you configured or existing tools to invoke for performing the task. At present, Amazon Q Developer supports stdio local MCP servers only.
- The MCP server interacts with the respective external system to get the live data that is used by Amazon Q to perform the required task.
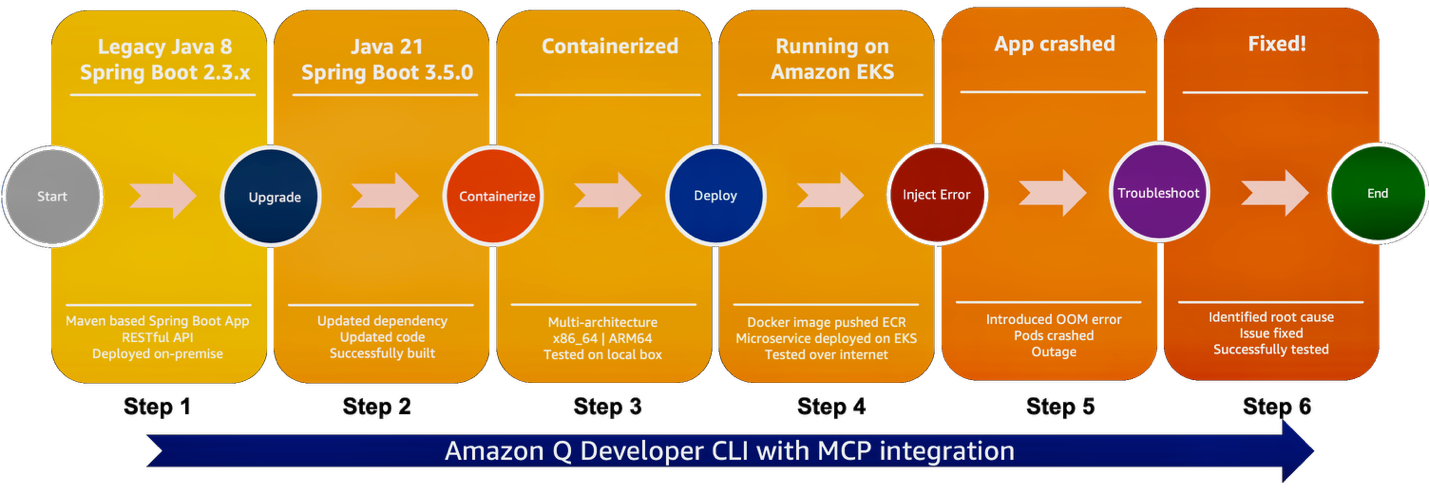
The solution follows these high-level steps, as shown in the following graphic:
- Create legacy Java Spring Boot application
- Upgrade Java and Spring Boot versions
- Containerize the upgraded application
- Deploy the application on Amazon EKS
- Introduce chaos
- Troubleshoot and fix
Prerequisites
You need to have the following configured before you start setting up the demo:
- Create an AWS account if you don’t already have one.
- Have access to an AWS account through the AWS Management Console and the AWS Command Line Interface (AWS CLI). The AWS Identity and Access Management (IAM) user that you use must have permissions to make the necessary AWS service calls and manage AWS resources mentioned in this post. While providing permissions to the IAM user, follow the principle of least privilege.
- Have Amazon Q for command line installed. Refer to Supported command line environments before installation.
Configure MCP in Amazon Q Developer CLI
MCP configuration in Amazon Q Developer CLI is managed through JSON files. You’ll configure Amazon Bedrock EKS MCP Server. At the time of this writing, only the stdio transport is supported in Amazon Q Developer CLI.
Amazon Q Developer CLI supports two levels of MCP configuration:
- Global configuration:
~/.aws/amazonq/mcp.json– Applies to all workspaces - Workspace configuration:
.amazonq/mcp.json –Specific to the current workspace
In this demonstration, we’re using workspace configuration, but you can use either of them. Follow these steps:
- Create a new workspace folder and inside that folder create
.amazonq/mcp.jsonfile with the following content:
- Open a terminal, navigate to the workspace folder that you created in step 1, and enter the following command to log into Amazon Q Developer CLI. Follow the instruction on the screen to login to Amazon Q Developer on the command line:
q login
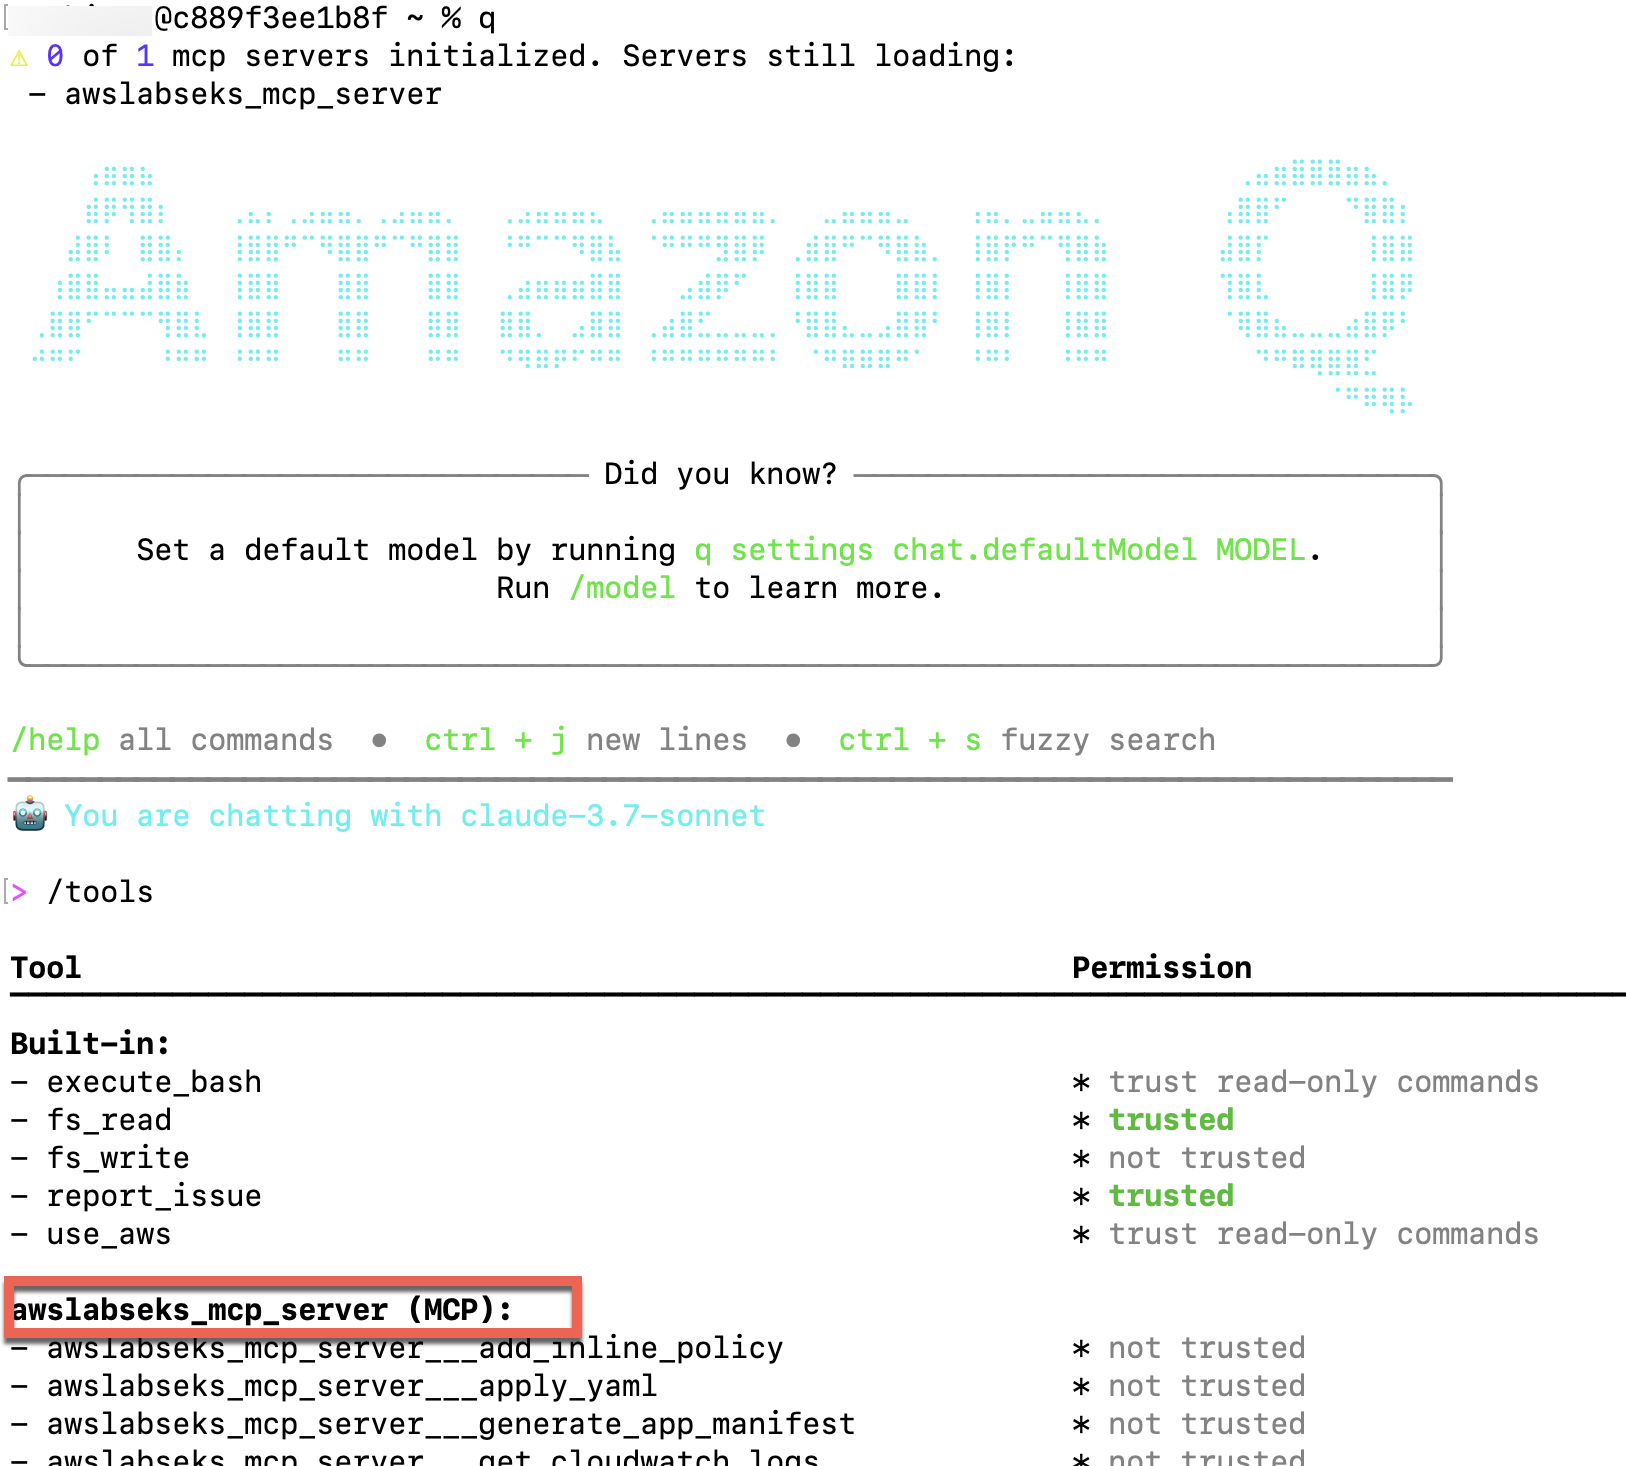
- Initiate the chat session by entering
qand then/toolsto validate that the Amazon EKS MCP server is configured, as shown in the following screenshot. By default, it won’t be trusted.
Migrate and modernize Java Spring Boot application
To migrate and modernize a Java Spring Boot application, complete the steps in the following sections.
Create legacy Java Spring Boot application
To create a legacy Java Spring Boot application, you first build a legacy Java 8, Spring Boot 2.3.x bookstore application, which you’ll modernize and migrate to AWS. Go back to Amazon Q Developer CLI and use natural language query to create the preceding application. Follow these steps:
- You can use your own words or use the following prompt to generate the code. The prompt generates the sample payloads to test the application. Keep a copy of those payloads for later use. To understand more about best practices for prompt engineering, refer to Mastering Amazon Q Developer Part 1: Crafting Effective Prompts in the AWS DevOps & Developer Productivity Blog.
- Provide approval to generate the legacy application.
Amazon Q Developer CLI generates the working code with Java 8 using Spring Boot 2.3.x framework.
- Explore the generated project files and validate the Java and Spring Boot versions.
- Provide the following prompt to run the application.
- Test the microservice using a REST API client or using curl command. You can also ask Amazon Q Developer CLI to test the application and fix errors, preparing a fully functional service!
- After testing is complete, stop the microservice. Your legacy application is now ready to be modernized.
- (Optional) Ask Amazon Q Developer CLI to generate a component and sequence diagram for the legacy application.
Refer to the following video for a quick demo.
Upgrade Java and Spring Boot versions
Upgrade the legacy Java Spring Boot application that you created in the previous step using Amazon Q Developer CLI.
As mentioned previously, if you’re using one of the supported integrated development environments (IDEs) and Java versions, you can use the /transform command within your IDE to perform this step.
- Use your own words or the following prompt to update the legacy application. Amazon Q Developer performs required changes in both maven pom.xml and Java code to upgrade to Java 21 and Spring Boot 3.5.0. It builds the code after the upgrade. If the build fails, then Amazon Q Developer iteratively tries to fix the build by applying necessary code and configuration changes.
- After the project upgrade is complete, validate the pom.xml for Java and Spring Boot versions. Explore the changes made to the Java code. The following example code from pom.xml validates the updated Java and Spring Boot versions:
- Provide the following prompt to run the application:
- Retest the microservice and make sure that it’s still working as expected. You can use Amazon Q Developer CLI to test, troubleshoot, and fix the upgraded application, if needed.
- After testing is complete, stop the microservice. Your legacy application is now upgraded to Java 21 and Spring Boot 3.5.0.
Refer to the following video to know more.
Containerize the upgraded application
Containerize the application so that the application can be run on both x86_64 and ARM64 hardware:
- Use your own words or the following prompt to create docker image for the application Amazon Q Developer creates the Dockerfile for your application and builds it to create images that can be run on x86_64 and ARM64 systems.
- Explore and validate the Dockerfile created by Amazon Q Developer for your application.
- Provide the following prompt to run the application on your local system:
- Test the microservice using a REST API client or using curl command. When it’s done, stop the docker container using the following prompt:
Your application is now containerized and tested on the local system. The heavy lifting of the making the code and configuration changes, updating the dependency, and writing Dockerfile is done by Amazon Q Developer.
Refer to the following video for a demo.
Deploy the application on Amazon EKS
Deploy the containerized application on Amazon EKS. To do so, create a new EKS cluster and use Helm Chart to deploy the application. Amazon Q Developer CLI uses Amazon EKS MCP server to perform some of these actions. Amazon Q Developer CLI uses the default profile unless instructed to use another.
- Use your own words or the following prompt to push the docker image to an Amazon Elastic Container Registry (Amazon ECR) repository:
- Provide the following prompt to deploy the image into a new EKS cluster using Helm chart:
- Enter the following command in the Amazon Q chat session to check the application pods are running. Alternately, ask Amazon Q chat to get the pods using kubectl:
- Test the microservice again to make sure that the deployed application is working as expected.
Your containerized application is now running successfully on the EKS cluster. This completes the migration and modernization of the legacy Java Spring Boot application.
Refer to the following video for a demo.
Introduce chaos
In real-world complex applications, while Amazon Q Developer performs the heavy lifting of upgrading, containerizing, and deploying the application on AWS, you might encounter application-specific environmental issues. In this step, you’ll simulate an out-of-memory (OOM) issue by introducing chaos into the system. You can introduce the chaos using one of the below options:
You can introduce the chaos using AWS Fault Injection Service EKS Pod actions or by following the below steps:
- Apply a patch deployment to reduce memory allocation:
- Introduce stress:
Wait until the pods crashes with an OOM error.
Refer to the following video for a demo.
Troubleshoot and fix
Troubleshoot the issue using Amazon Q Developer CLI with EKS MCP server:
- Use your own words or the following prompt to start troubleshooting the application using Amazon Q Developer CLI. It might take multiple iterations to identify the root cause and potential fix.
- After you validate that Amazon Q Developer CLI can identify the root cause of the issue and suggest a potential solution, provide approval to let it fix the issue:
- Validate the application is running fine by checking the pod status and invoking the APIs using curl command or a REST API client.
Modifications related to security in Amazon EKS are out of scope for this post. Follow the security best practices before moving into production. Using Amazon Q Developer, you can accelerate the migration and modernization journey, but as the owner of the code, you need to do the due diligence on the changes.
Due to the inherent nondeterministic nature of the FMs, the responses of the Amazon Q Developer CLI might not be exactly same as those shown in the demo. You need to adjust the prompts accordingly.
Refer to the following video for a demo.
Clean up
Properly decommissioning provisioned AWS resources is an important best practice to optimize costs and enhance security posture after concluding proofs of concept and demonstrations. Follow the steps to delete the resources created in your AWS account:
- Use your own words or the following prompt to identify the resources that were created during this demonstration.
- Carefully validate whether Amazon Q Developer has correctly identified only the desired resources to be deleted and then provide approval. If in doubt, manually delete them.
- Delete the
.amazonq/mcp.jsonfile from your workspace folder to remove MCP configuration for Amazon Q Developer CLI.
Conclusion
In this post, you learned how Amazon Q Developer CLI with Amazon EKS MCP server integration interprets natural language queries, automatically converts them into appropriate commands, and identifies the necessary tools for execution. You upgraded a legacy Java Spring Boot application, then containerized it to support deployment on multi-architectural computes. You deployed the application on Amazon EKS, introduced chaos, and resolved the issues using natural language queries. Using Amazon Q Developer CLI, you can improve your developer’s productivity many times over. We encourage you to explore additional use cases and share your feedback with us!
Further study
For more information on Amazon Q Developer CLI and AWS MCP servers:
- Using Amazon Q Developer on the command line
- Using MCP with Amazon Q Developer
- AWS MCP Servers
- AWS MCP Servers GitHub
About the authors

Biswanath Mukherjee is a Senior Solutions Architect at Amazon Web Services. He works with large strategic customers of AWS by providing them technical guidance to migrate and modernize their applications on AWS Cloud. With his extensive experience in cloud architecture and migration, he partners with customers to develop innovative solutions that leverage the scalability, reliability, and agility of AWS to meet their business needs. His expertise spans diverse industries and use cases, enabling customers to unlock the full potential of the AWS Cloud.
 Upendra V is a Senior Solutions Architect at Amazon Web Services, specializing in Generative AI and cloud solutions. He helps enterprise customers design and deploy production-ready Generative AI workloads, implement Large Language Models (LLMs) and Agentic AI systems, and optimize cloud deployments. With expertise in cloud adoption and machine learning, he enables organizations to build and scale AI-driven applications efficiently.