Chat-based assistants powered by Retrieval Augmented Generation (RAG) are transforming customer support, internal help desks, and enterprise search, by delivering fast, accurate answers grounded in your own data. With RAG, you can use a ready-to-deploy foundation model (FM) and enrich it with your own data, making responses relevant and context-aware without the need for fine-tuning or retraining. Running these chat-based assistants on Amazon Elastic Kubernetes Service (Amazon EKS) gives you the flexibility to use a variety of FMs, retaining full control over your data and infrastructure.
Amazon EKS scales with your workload and is cost-efficient for both steady and fluctuating demand. Because EKS is certified Kubernetes-conformant, it is compatible with existing applications running on a standard Kubernetes environment, whether hosted on on-premises data centers or public clouds. For your data plane, you can take advantage of a wide range of compute options, including CPUs, GPUs, AWS purpose-built AI chips (AWS Inferentia and AWS Trainium) and ARM-based CPU architectures (AWS Graviton), to match performance and cost requirements. Such flexibility makes Amazon EKS an ideal candidate for running heterogeneous workloads because you can compose different compute substrates, within the same cluster, to optimize both performance and cost efficiency.
NVIDIA NIM microservices consist of microservices that deploy and serve FMs, integrating with AWS services such as Amazon Elastic Compute Cloud (Amazon EC2), Amazon EKS, and Amazon SageMaker. NIM microservices are distributed as Docker containers and are available through the NVIDIA NGC Catalog. Deploying GPU-accelerated models manually requires you to select and configure runtimes such as PyTorch or TensorFlow, set up inference servers such as Triton, implement model optimizations, and troubleshoot compatibility issues. This takes engineering time and expertise. NIM microservices eliminate this complexity by automating these technical decisions and configurations for you.
The NVIDIA NIM Operator is a Kubernetes management tool that facilitates the operation of model-serving components and services. It handles large language models (LLMs), embedders, and other model types through NVIDIA NIM microservices within Kubernetes environments. The Operator streamlines microservice management through three primary custom resources. First, the NIMCache resource facilitates model downloading from NGC and network storage persistence. This enables multiple microservice instances to share a single cached model, improving microservice startup time. Second, the NIMService resource manages individual NIM microservices, creating Kubernetes deployments within specified namespaces. Third, the NIMPipeline resource functions as an orchestrator for multiple NIM service resources, allowing coordinated management of service groups. This architecture enables efficient operation and lifecycle management, with particular emphasis on reducing inference latency through model caching and supporting automated scaling capabilities.
NVIDIA NIM, coupled with the NVIDIA NIM Operator, provide a streamlined solution to address the deployment complexities stated in the opening. In this post, we demonstrate the implementation of a practical RAG chat-based assistant using a comprehensive stack of modern technologies. The solution uses NVIDIA NIMs for both LLM inference and text embedding services, with the NIM Operator handling their deployment and management. The architecture incorporates Amazon OpenSearch Serverless to store and query high-dimensional vector embeddings for similarity search.
The underlying Kubernetes infrastructure of the solution is provided by EKS Auto Mode, which supports GPU-accelerated Amazon Machine Images (AMIs) out of the box. These images include the NVIDIA device plugin, the NVIDIA container toolkit, precompiled NVIDIA kernel drivers, the Bottlerocket operating system, and Elastic Fabric Adapter (EFA) networking. You can use Auto Mode with Accelerated AMIs to spin up GPU instances, without manually installing and configuring GPU software components. Simply specify GPU-based instance types when creating Karpenter NodePools, and EKS Auto Mode will launch GPU-ready worker nodes to run your accelerated workloads.
Solution overview
The following architecture diagram shows how NVIDIA NIM microservices running on Amazon EKS Auto Mode power our RAG chat-based assistant solution. The design, shown in the following diagram, combines GPU-accelerated model serving with vector search in Amazon OpenSearch Serverless, using the NIM Operator to manage model deployment and caching through persistent Amazon Elastic File System (Amazon EFS) storage.
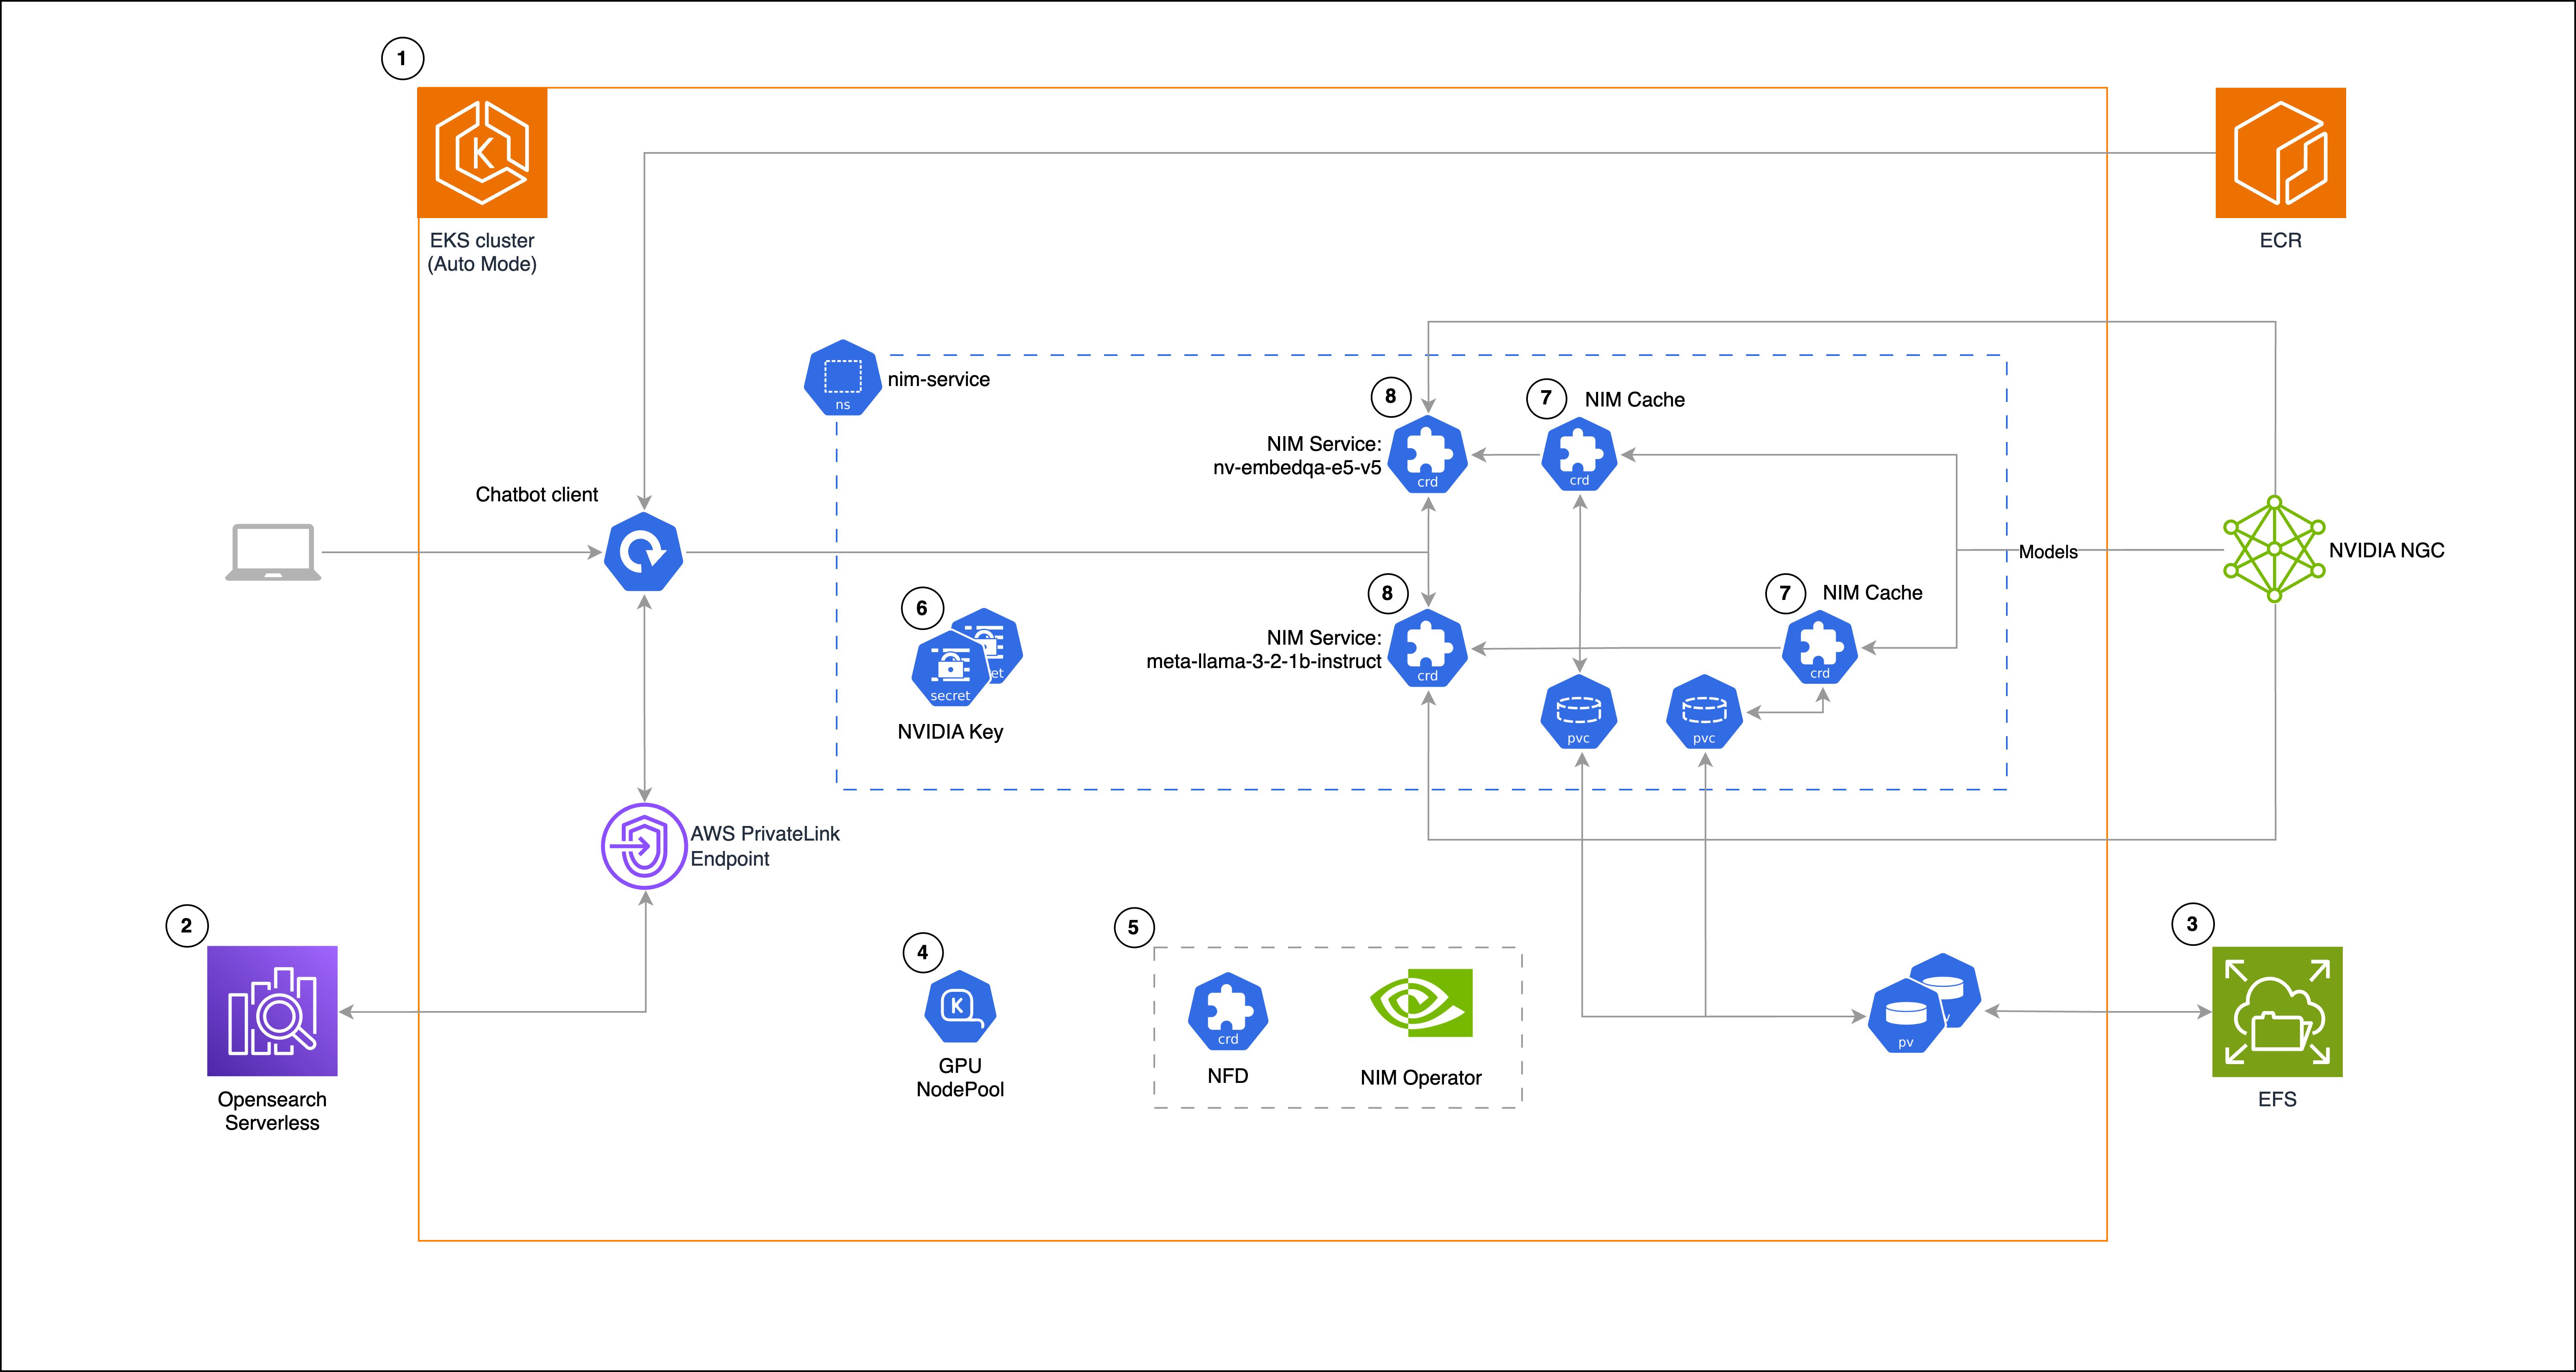
Solution diagram (numbers indicate steps in the solution walkthrough section)
The solution follows these high-level steps:
- Create an EKS cluster
- Set up Amazon OpenSearch Serverless
- Create an EFS file system and set up necessary permissions
- Create Karpenter GPU
NodePool - Install NVIDIA Node Feature Discovery (NFD) and NIM Operator
- Create nim-service namespace and NVIDIA secrets
- Create
NIMCaches - Create
NIMServices
Solution walkthrough
In this section, we walk through the implementation of this RAG chat-based assistant solution step by step. We create an EKS cluster, configure Amazon OpenSearch Serverless and EFS storage, set up GPU-enabled nodes with Karpenter, deploy NVIDIA components for model serving, and finally integrate a chat-based assistant client using Gradio and LangChain. This end-to-end setup demonstrates how to combine LLM inference on Kubernetes with vector search capabilities, forming the foundation for a scalable, production-grade system—pending the addition of monitoring, auto scaling, and reliability features.
Prerequisites
To begin, ensure you have installed and set up the following required tools:
- AWS CLI (version aws-cli/2.27.11 or later)
kubectleksctl(use version v0.195.0 or later to support Auto Mode)- Helm
These tools need to be properly configured according to the Amazon EKS setup documentation.
Clone the reference repository and cd into the root folder:
Environment setup
You need an NGC API key to authenticate and download NIM models. To generate the key, you can enroll (for free) in the NVIDIA Developer Program and then follow the NVIDIA guidelines.
Next, set up a few environment variables (replace the values with your information):
Pattern deployment
To perform the solution, complete the steps in the following sections.
Create an EKS cluster
Deploy the EKS cluster using EKS Auto Mode, with eksctl :
Pod Identity Associations connect Kubernetes service accounts to AWS Identity and Access Management (IAM) roles, allowing pods to access AWS services securely. In this configuration, a service account will be created and associated with an IAM role, granting it full permissions to OpenSearch Serverless (in a production environment, restrict privileges according to the principle of least privilege).
NIMCaches require volume AccessMode: ReadWriteMany. Amazon Elastic Block Store (Amazon EBS) volumes provided by EKS Auto Mode aren’t suitable because they support ReadWriteOnce only and can’t be mounted by multiple nodes. Storage options that support AccessMode: ReadWriteMany include Amazon EFS, as shown in this example, or Amazon FSx for Lustre, which offers higher performance for workloads with greater throughput or latency requirements.
The preceding command will take a few minutes to be completed. When it’s completed, eksctl configures your kubeconfig and points it to the new cluster. You can validate that the cluster is up and running and that the EFS addon is installed by entering the following command:
Expected output:
Set up Amazon OpenSearch Serverless
A vector database stores and searches through numerical representations of text (embeddings). Such a component is essential in RAG chat-based assistant architectures because it facilitates finding relevant information related to a user question based on semantic similarity rather than exact keyword matches.
We use Amazon OpenSearch Service as the vector database. OpenSearch Service provides a managed solution for deploying, operating, and scaling OpenSearch clusters within AWS Cloud infrastructure. As part of this service, Amazon OpenSearch Serverless offers an on-demand configuration that automatically handles scaling to match your application’s requirements.
First, using AWS PrivateLink, create a private connection between the cluster’s Amazon Virtual Private Cloud (Amazon VPC) connection and Amazon OpenSearch Serverless. This keeps traffic within the AWS network and avoids public internet routing.
Enter the following commands to retrieve the cluster’s virtual private cloud (VPC) ID, CIDR block range, and subnet IDs, and store them in corresponding environment variables:
Use the following code to create a security group for OpenSearch Serverless in the VPC, add an inbound rule to the security group allowing HTTPS traffic (port 443) from your VPC’s CIDR range, and create an OpenSearch Serverless VPC endpoint connected to the subnets and security group:
In the following steps, create an OpenSearch Serverless collection (a logical unit to store and organize documents).
- Create an encryption policy for the collection:
- The network policy that restricts access to the collection to only come through a specific VPC endpoint:
- The data policy that grants permissions to the IAM chat-based assistant role for interacting with indices in the collection:
- The OpenSearch collection itself:
Create EFS file system and set up necessary permissions
Create an EFS file system:
EFS requires mount targets, which are VPC network endpoints that connect your EKS nodes to the EFS file system. These mount targets must be reachable from your EKS worker nodes, and access is controlled using security groups.
- Execute the following command to set up the mount targets and configure the necessary security group rules:
- Create the
StorageClassin Amazon EKS for Amazon EFS:
- Validate the EFS storage class:
These are the expected results:
Create Karpenter GPU NodePool
To create the Karpenter GPU NodePool, enter the following code:
This NodePool is designed for GPU workloads using AWS G5 instances, which feature NVIDIA A10G GPUs. The taint ensures that only workloads specifically designed for GPU usage will be scheduled on these nodes, maintaining efficient resource utilization. In a production environment, you might want to consider using Amazon EC2 Spot Instances as well to optimize on costs.
Enter the command to validate successful creation of the NodePool:
These are the expected results:
gpu-node-pool was created and has 0 nodes. To inspect nodes further, enter this command:
This is the expected output:
There are two instances, launched by EKS Auto Mode with non-accelerated Bottlerocket Amazon Machine Image (AMI) variant aws-k8s-1.32, and CPU-only (non-GPU) instance type c6g.
Install NVIDIA NFD and NIM Operator
The NFD is a Kubernetes plugin that identifies available hardware capabilities and system settings. NFD and NIM Operator are installed using Helm charts, each with their own custom resource definitions (CRDs).
- Before proceeding with installation, verify if related CRDs exist in your cluster:
If these CRDs aren’t present, both commands will return no results.
- Add Helm repos:
- Install the NFD dependency for NIM Operator:
- Validate the pods are up and CRDs were created:
Expected output:
Expected output:
- Install the NIM Operator:
You might need to use version v1.0.1 for the NIM Operator instead of v2.0.0 as shown in the preceding code example because occasionally you might receive a “402 Payment Required” message.
- Validate the pod is up and CRDs were created:
Expected output:
Expected output:
Create nim-service namespace and NVIDIA secrets
In this section, create the nim-service namespace and add two secrets containing your NGC API key.
- Create namespace and secrets:
- Validate secrets were created:
The following is the expected result:
ngc-secret is a Docker registry secret used to authenticate and pull NIM container images from NVIDIA’s NGC container registry.
ngc-api-secret is a generic secret used by the model puller init container to authenticate and download models from the same registry.
Create NIMCaches
RAG enhances chat applications by enabling AI models to access either internal domain-specific knowledge or external knowledge bases, reducing hallucinations and providing more accurate, up-to-date responses. In a RAG system, a knowledge base is created from domain-specific documents. These documents are sliced into smaller pieces of text. The text pieces and their generated embeddings are then uploaded to a vector database. Embeddings are numerical representations (vectors) that capture the meaning of text, where similar text content results in similar vector values. When questions are received from users, they’re also sent with their respective embeddings to the database for semantic similarity search. The database returns the closest matching chunks of text, which are used by an LLM to provide a domain-specific answer.
We use Meta’s llama-3-2-1b-instruct as LLM and NVIDIA Retrieval QA E5 (embedqa-e5-v5) as embedder.
This section covers the deployment of NIMCaches for storing both the LLM and embedder models. Local storage of these models speeds up pod initialization by eliminating the need for repeated downloads. Our llama-3-2-1b-instruct LLM, with 1B parameters, is a relatively small model and uses 2.5 GB of storage space. The storage requirements and initialization time increase when larger models are used. Although the initial setup of the LLM and embedder caches takes 10–15 minutes, subsequent pod launches will be faster because the models are already available in the cluster’s local storage.
Enter the following command:
This is the expected output:
NIMCaches will create PersistentVolumes (PVs) and PersistentVolumeClaims (PVCs) to store the models, with STORAGECLASS efs:
The following is the expected output:
Enter the following to validate NIMCaches:
This is the expected output (STATUS will stay initially blank, then become InProgress for 10–15 mins until model download is complete):
Create NIMServices
NIMServices are custom resources to manage NVIDIA NIM microservices. To deploy the LLM and embedder services enter the following:
The following is the expected output:
Validate the NIMServices:
The following is the expected output:
Our models are stored in an EFS volume, which is mounted to the EC2 instances as a PVC. That translates to faster pod startup times. In fact, notice in the preceding example that the NIMServices are ready in approximately 5 minutes. This time includes GPU node(s) launch from Karpenter and container image pull and launch.
Compared to the 10–15 minutes required for internet-based model downloads, as experienced during the NIMCaches deployment, loading models from the local cache reduces startup time considerably, enhancing the overall system scaling speed. Should you need even more performing storage alternatives, you could explore alternatives such as Amazon FSx for Lustre.
Enter the following command to check the nodes again:
The following is the expected output:
Karpenter launched two new GPU instances to support NIMServices, with a Bottlerocket accelerated AMI variant Bottlerocket (EKS Auto, Nvidia) 2025.4.21 (aws-k8s-1.32-nvidia). The number and type of instances launched might vary depending on Karpenter’s algorithm, which takes into consideration parameters such as instance availability and cost.
Confirm that the NIMService STATUS is Ready before progressing further.
Chat-based assistant client
We now use a Python client, implementing the chat-based assistant interface, using the Gradio and LangChain libraries. Gradio creates the web interface and chat components, handling the frontend presentation. LangChain connects various components and implements RAG through multiple services in our EKS cluster. Meta’s llama-3-2-1b-instruct serves as the base language model, and nv-embedqa-e5-v5 creates text embeddings. OpenSearch acts as the vector store, managing these embeddings and enabling similarity search. This setup allows the chat-based assistant to retrieve relevant information and generate contextual responses.
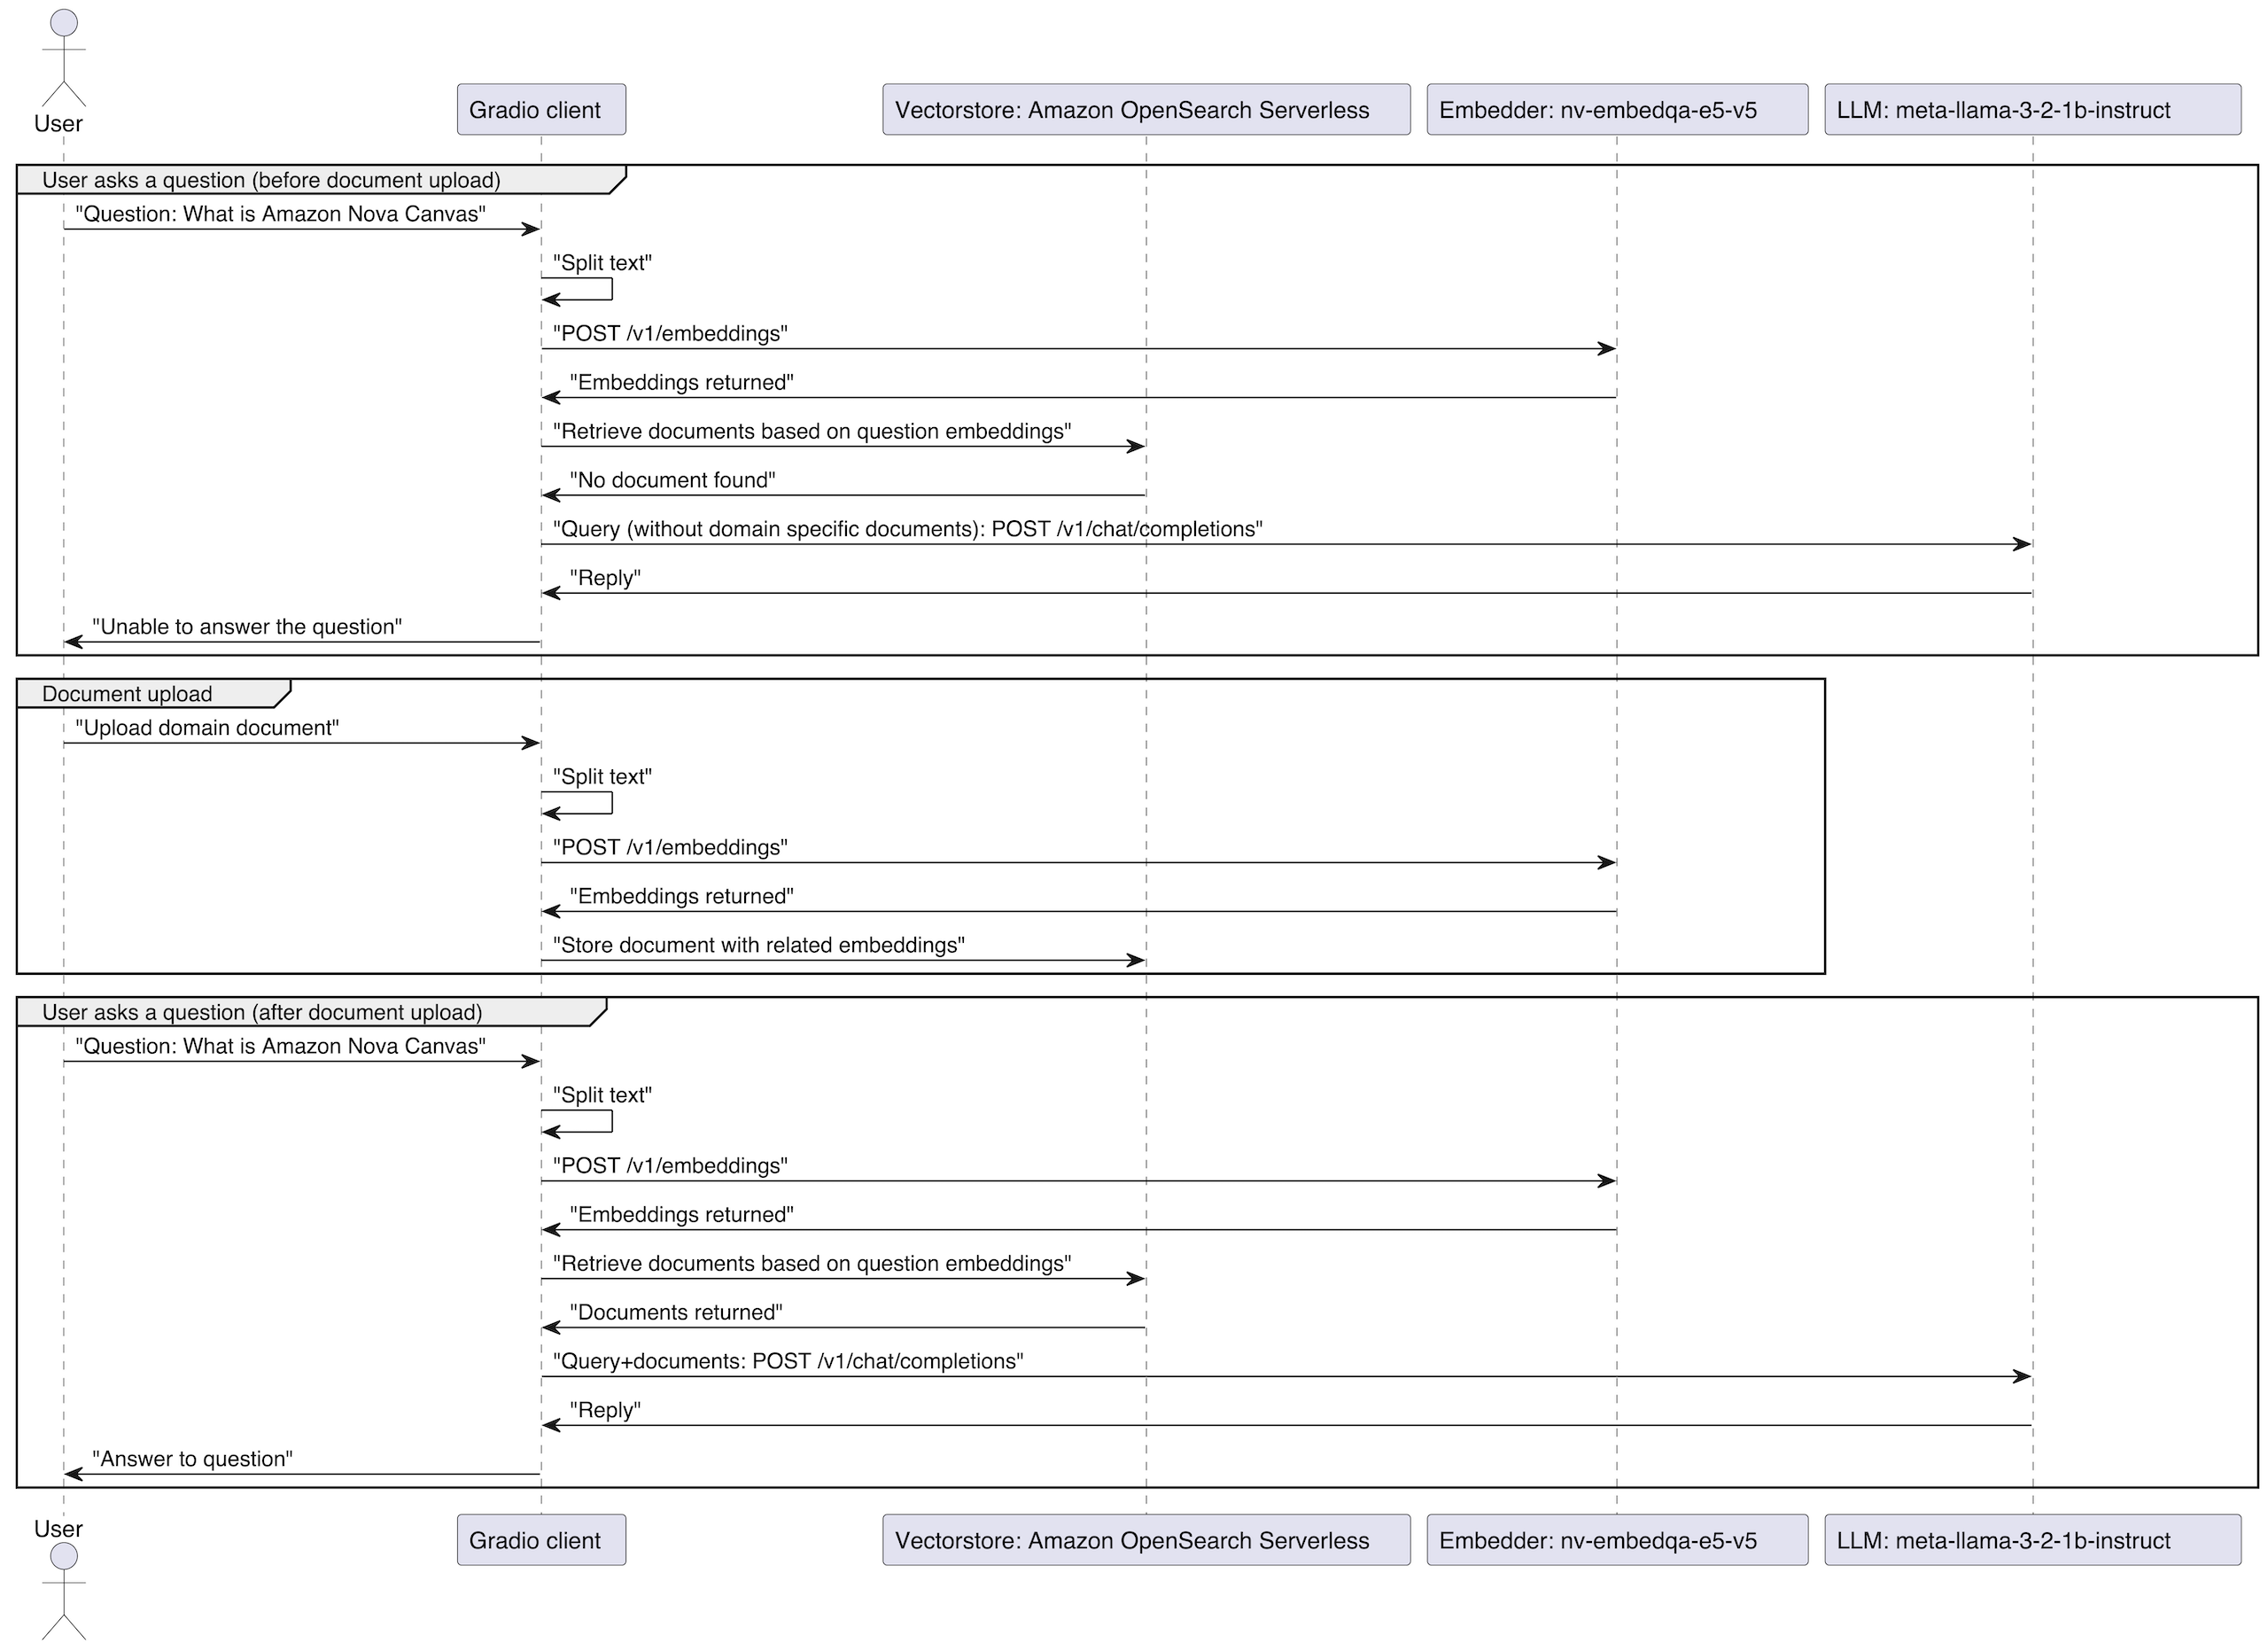
Sequence diagram showing question-answering workflow with document upload process
- Enter the following commands to deploy the client, hosted on Amazon Elastic Container Registry (Amazon ECR) as a container image in the public gallery (the application’s source files are available in the
clientfolder of the cloned repository):
- Check the client pod status:
The following is the example output:
- Port-forward the client’s service:
- Open a browser window at
http://127.0.0.1:7860.
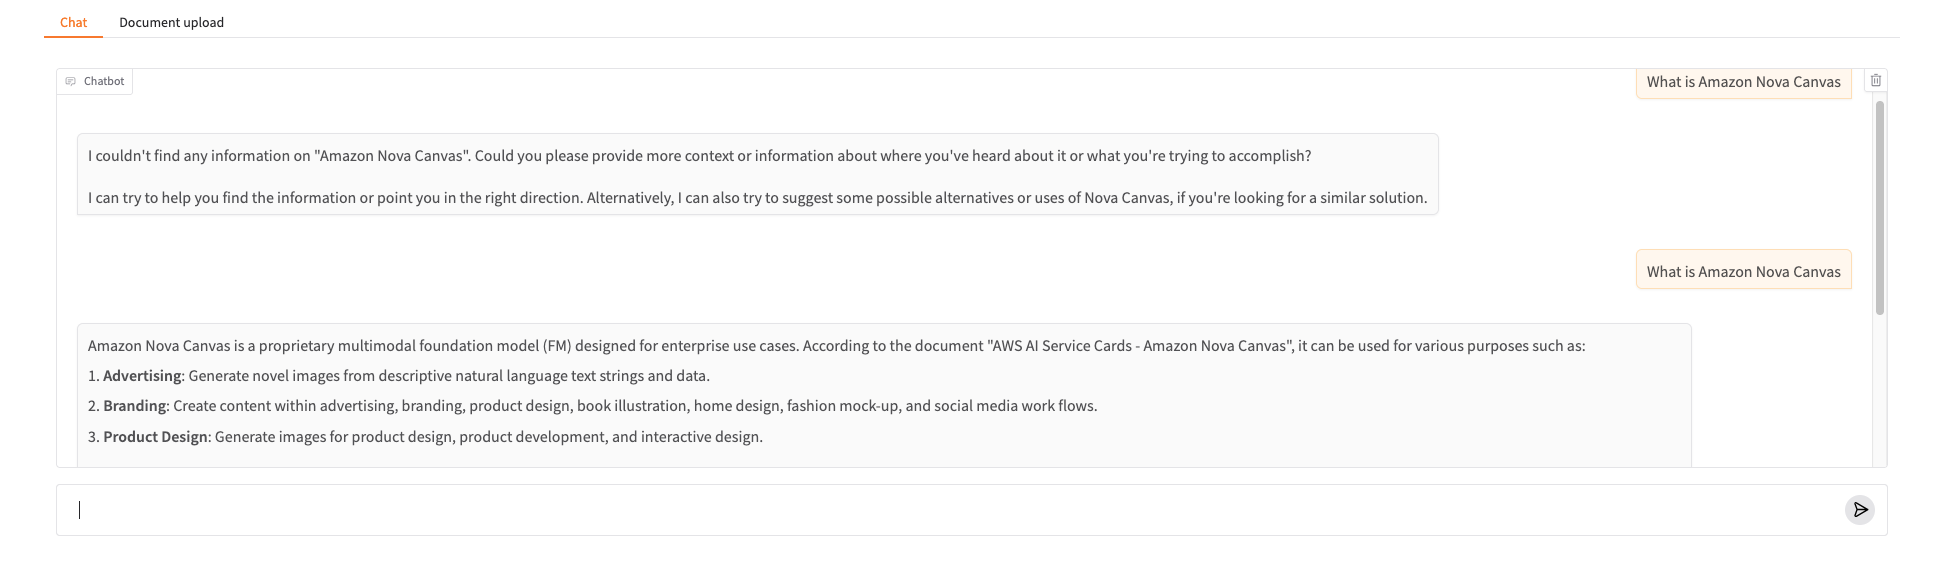
In the following screenshot, we prompted the chat-based assistant about a topic that isn’t in its knowledge base yet: “What is Amazon Nova Canvas.”
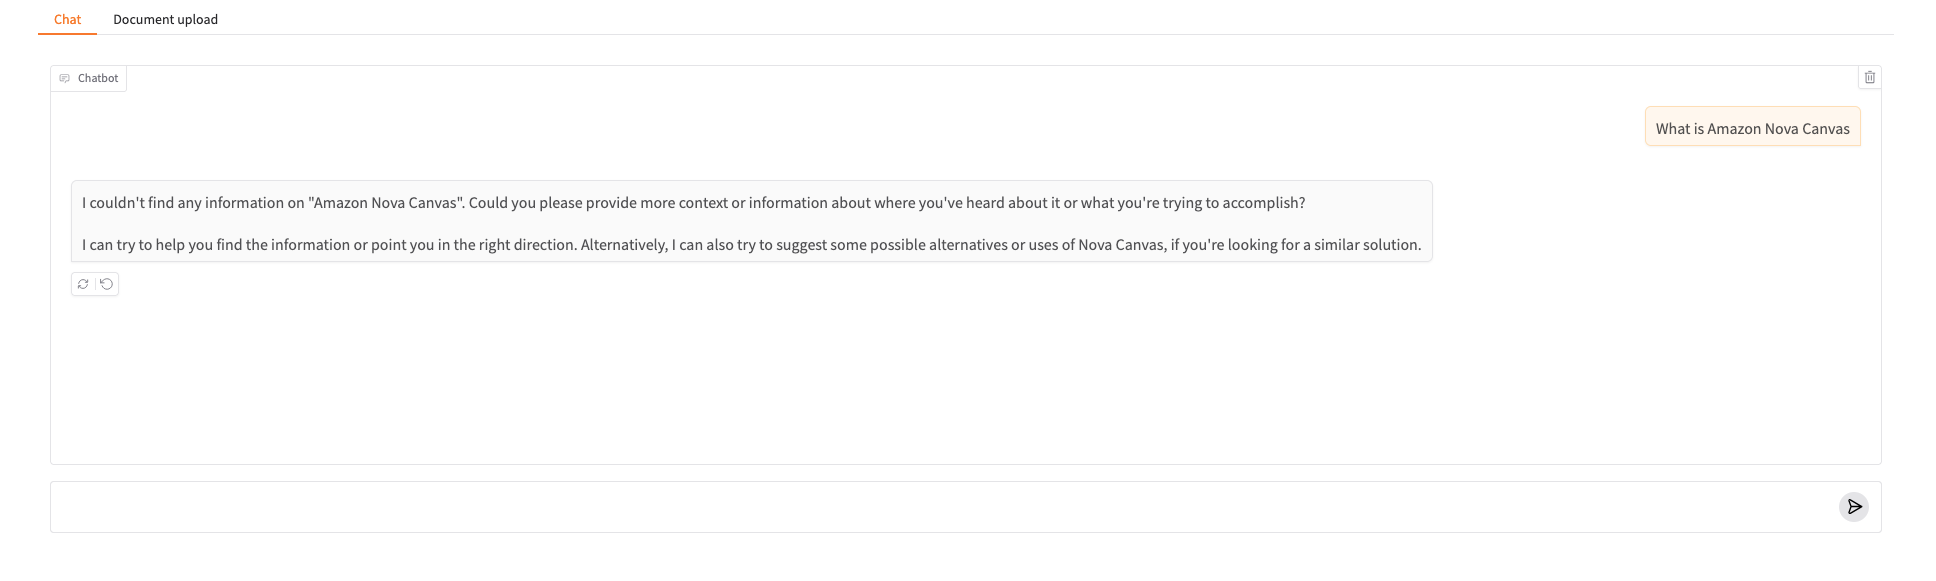
The chat-based assistant can’t find information on the topic and can’t formulate a proper answer.
- Download the file at location:
https://docs.aws.amazon.com/pdfs/ai/responsible-ai/nova-canvas/nova-canvas.pdfand upload its embeddings to OpenSearch Serverless using the client UI, switching to the Document upload tab, in the top left, as shown in the following screenshot.
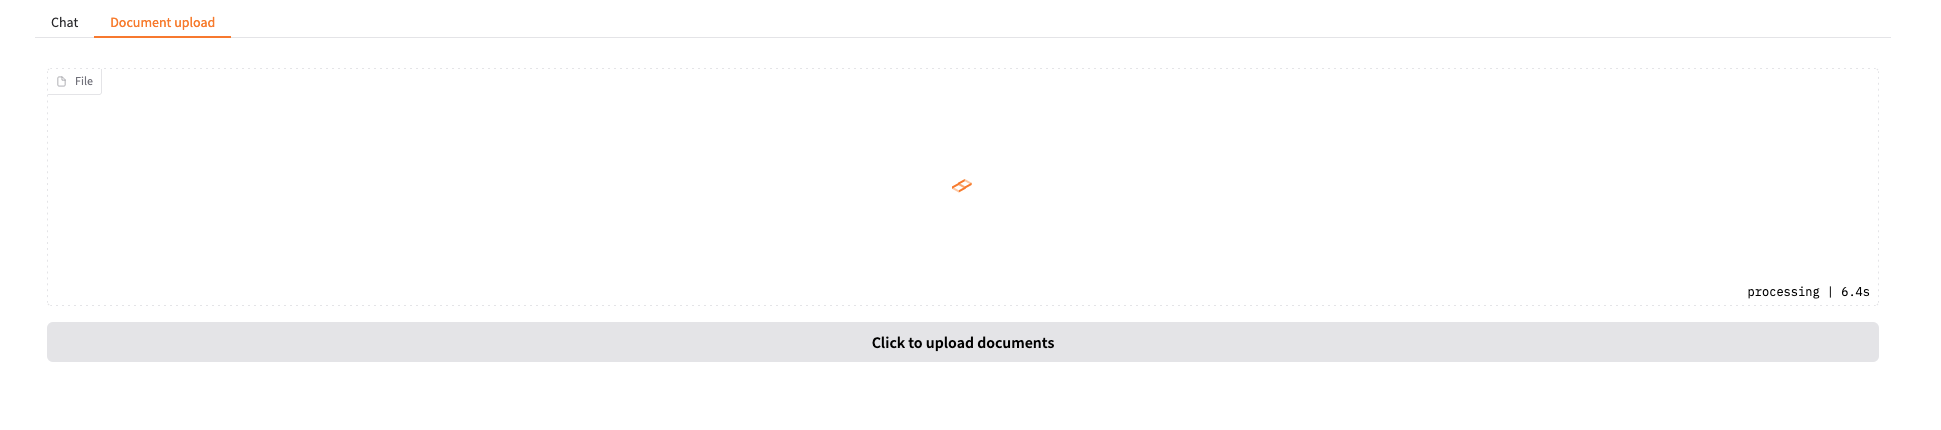
The expected result is nova-canvas.pdf appearing the list of uploaded files, as shown in the following screenshot.

- Wait 15–30 seconds for OpenSearch Serverless to process and index the data. Ask the same question, “What is Amazon Nova Canvas,” and you will receive a different answer, as shown in the following screenshot.
Cleanup
To clean up the cluster and the EFS resources created so far, enter the following command:
Wait approximately 30 seconds for the mount targets to be removed, then enter the following command:
To delete the OpenSearch Serverless collection and policies, enter the following command:
Conclusion
In this post, we showed how to deploy a RAG-enabled chat-based assistant on Amazon EKS, using NVIDIA NIM microservices, integrating an LLM for text generation, an embedding model, and Amazon OpenSearch Serverless for vector storage. Using EKS Auto Mode with GPU-accelerated AMIs, we streamlined our deployment by automating the setup of GPU infrastructure. We specified GPU-based instance types in our Karpenter NodePools, and the system automatically provisioned worker nodes with all necessary NVIDIA components, including device plugins, container toolkit, and kernel drivers. The implementation demonstrated the effectiveness of RAG, with the chat-based assistant providing informed responses when accessing relevant information from its knowledge base. This architecture showcases how Amazon EKS can streamline the deployment of AI solutions, maintaining production-grade reliability and scalability.
As a challenge, try enhancing the chat-based assistant application by implementing chat history functionality to preserve context across conversations. This allows the LLM to reference previous exchanges and provide more contextually relevant responses. To further learn how to run artificial intelligence and machine learning (AI/ML) workloads on Amazon EKS, check out our EKS best practices guide for running AI/ML workloads, join one of our Get Hands On with Amazon EKS event series, and visit AI on EKS deployment-ready blueprints.
About the authors
 Riccardo Freschi is a Senior Solutions Architect at AWS who specializes in Modernization. He helps partners and customers transform their IT landscapes by designing and implementing modern cloud-native architectures on AWS. His focus areas include container-based applications on Kubernetes, cloud-native development, and establishing modernization strategies that drive business value.
 Christina Andonov is a Sr. Specialist Solutions Architect at AWS, helping customers run AI workloads on Amazon EKS with open source tools. She’s passionate about Kubernetes and known for making complex concepts easy to understand.